
CxUtilSvc.exe is basically a part of an audio driver that is used in laptop and PC and belongs to a company called Conexant Systems, Inc. The company was declared defunct in 2017, so if the process is running on your PC/laptop, it was probably manufactured before that. It is a background process and an essential component for the proper functioning of audio devices on your PC.

CxUtilSvc.exe stands for the process ‘Conexant Utility Service’. Here we will take a look at the file’s properties, uses, and methods to fix errors related to it.
Quick Overivew
Properties
CxUtilSvc.exe is not a system process but it is crucial for the audio driver software and thus it should start automatically with Windows boot up. Here are some file details-
| File Name: | CxUtilSvc.exe |
| File Size: | 106 KB, 132 KB (depending upon the version) |
| File Location:* | C:\Program Files\Conexant\SA3\CxUtilSvc.exe |
| Publisher: | Conexant Systems, Inc |
| Digital Signature: | Yes, Verisign |
Note: Some laptop manufacturers put CxUtilSvc.exe under a different folder name. In that case, you might find the file in directories like this:
- For Dell notebooks: C:\Program Files\Conexant\SA3\Dell-Notebook\
- For Asus notebooks: C:\Program Files\Conexant\SA3\ASUS\
- For HP notebooks: C:\Program Files\Conexant\SA3\HP-NB-AIO\
Or some other folder name depending on your laptop’s brand.
Functions of CxUtilSvc.exe
CxUtilSvc.exe is a background process responsible for running the Conexant SmartAudio driver software. Without the audio driver software working properly, you will experience problems with your sound output to headphones and speakers connected to your PC. Hence, CxUtilSvc.exe is an important process to ensure the proper functioning of the audio devices.
Is CxUtilSvc.exe safe or a threat?
The genuine CxUtilSvc.exe is a completely safe and trustworthy file. It is made by a legitimate company and is an important part of the audio driver software on your PC. However, there is a possibility that it can be Trojan malware if it is causing issues and errors on your computer. To check if it is real or a virus, right-click on the file, open properties, and check if it has a digital signature or not.
In case it is a virus:
- The digital signature will be absent or invalid
- The file location may differ from the one stated above.
A corrupted or infected CxUtilSvc.exe may cause errors in your system.
Another similar file Audiodg.exe, RtHDVBg.exe belongs to Realtek.
Errors related to CxUtilSvc.exe
Errors related to the file CxUtilSvc.exe are accompanied by the following messages.
- “Failed to create Conexant Audio Factory, The SmartAudio will now exit”
- “A Conexant audio device could not be found. The application will now exit”
Causes of these errors:
- CxUtilSvc.exe not running
- Corrupted driver files
- The original CxUtilSvc.exe may have been replaced or infected by a virus program
Methods to fix the errors
Method 1: Uninstalling and reinstalling the audio driver
1) Right-click on This PC (or My Computer) icon on your desktop
2) Click on manage, a new application called Computer Management will open
3) From the left panel, click on Device Manager
4) Double-click on Audio inputs and outputs
5) Under Audio inputs and outputs, right-click Conexant SmartAudio and choose Uninstall

Right-click on Conexant SmartAudio and press Uninstall
6) Restart your computer. The driver will be reinstalled automatically by Windows after the restart.
Method 2: Starting CxUtilSvc.exe from services
1) Search Services in the start menu and open it
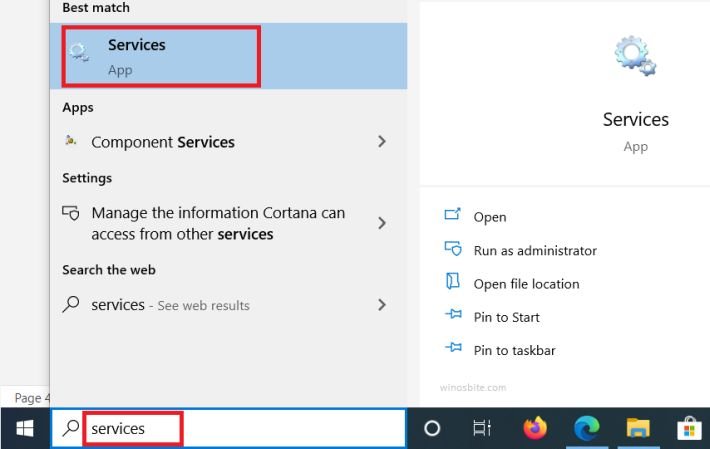
3) Find CxUtilSvc in the list of items and open it
4) In startup type, choose Automatic and start the application
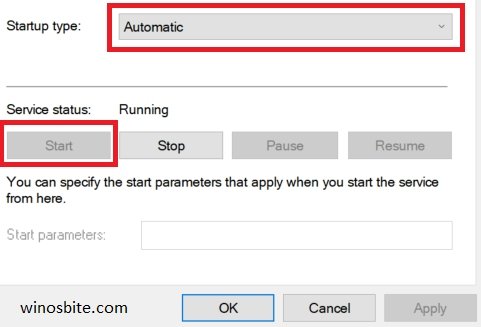
Start the service and set startup type as automatic
5) Press Apply and OK, then close services
6) Restart your PC and check if the issue is resolved.
Method 3: Run system file checker
1) Open command prompt as admin
2) Type this command and press ENTER
sfc/scannow
3) Let it scan and repair your system files.

system file checker verifies the integrity of system files
Method 4: Run antivirus scan
Scan your PC using your antivirus software. If you don’t have one, use the following steps to scan using Windows Defender.
1) Search Windows Security in the start menu and open it
2) Click on Virus & Threat Protection and press Quick scan button

Virus and threat protection quick scan
3) Alternatively, you can also do a full scan, but it may take some time.
Conclusion
I hope this article helped you fix the errors. In case of queries and suggestions, please don’t mind leaving a comment or contacting us.


