
audiodg.exe comes with Windows 10/8/7 OS. It’s not a virus but used for Audio devices. Learn about its uses, common errors like high CPU usage and steps to fix it. Audiodg.exe is a Microsoft Windows authentic external component and is the short form for “Windows Audio Device Graph Isolation”.
Quick Overivew
What exactly is Audiodg.exe?
Audiodg.Exe is an executable file, as suggested by the .exe extension that is developed by a third-party for Windows 10, 8.1, 8, 7 & Vista and serves as the audio engine of the operating system. In simple words, you can listen to any audio file on your system and apply audio enhancement techniques with the help of Audiodg.
It generally auto-launches when the system starts. As formerly mentioned, this process runs as a separate service and not as the same session run by the system logged user, which means that this is a third-party window audio service independent process that allows vendor audio applications to run the system audio. This is done to prevent the crash of the entire system in case the process goes kaput and is known as Digital signal processing.
File size & Location
The file size of Audiodg.exe is approximately 0.08 MB to 0.48 MB.
It is located in the “C” drive of the system under “System 32” of the windows path. The abridged location is C:\Windows\System32.
Quick Overview
| Filename: | Audiodg.exe |
| File description: | Windows Audio Device Graph Isolation |
| File version: | 6.1.7601.17514 |
| File Size: | 124 KB |
| Product name: | Microsoft® Windows® Operating System |
| File type: | Application |
| Copyright: | Microsoft Corporation |
| Language: | English |
| Location: | C:\Windows\System32 |
Is Audiodg.exe a malware/virus?
No, Audiodg.exe is a safe windows system process. However, sometimes the viruses or other malware programs name their process like Trojan.Win32.Agentb.aejp or something similar so as to creep into the system without being identified by the installed anti-malware software or system firewalls.
So, if the audiodg.exe is not located under the file location C:\Windows\System32 then it could most probably be a virus or malware.
How should I fix the malware?
Simply download and run an anti-malware software like Kaspersky or Malwarebytes premium to detect and permanently remove the virus or use the security task manager to identify such malware and delete them. It is important to constantly update the anti-malware software and also keep scanning the system periodically.
Common Errors
On starting the system, runtime errors might pop up. This may occur due to many reasons like if the system is unable to locate the Audiodg.exe or because the program is corrupt or likewise.
Some errors include:
- Audiodg.exe could not be found
- The file could not be installed
- The file is missing or corrupt
- The file is not a valid Win32 application
These errors can be resolved by uninstalling or updating the audidg.exe application.
There are several executable files like WUDFHost.exe, kvoop.exe, etc.
How to fix Audiodg.exe high CPU usage?
When running the audioag.exe service, the CPU usage may yank up. Sometimes, it could be between 3% to 81% or even reach 100% of CPU usage. Any default window process will not even use ~3%. This could crack the audio or lead to a flaky system sound. However, there are a few ways to fix it.
Solution 1 – Update Sound Card Driver
The second way out is to uninstall the audio driver in the “Device manager” under the control panel or simply update the driver.
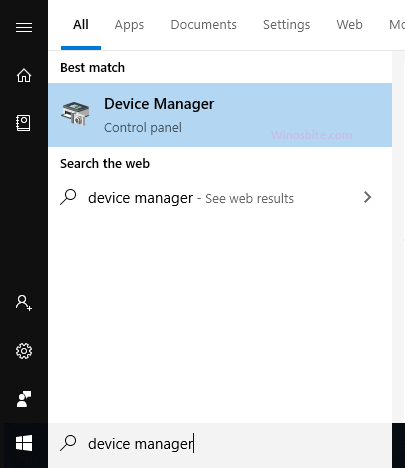
- Click on the Start button
- Type Device Manager and click on it

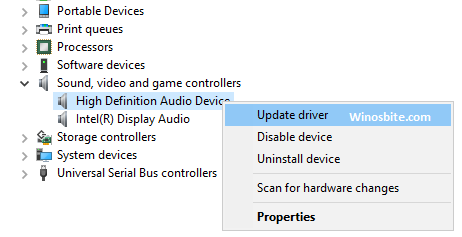
- Click on Sound, video, and game controllers
- Now, Right-click on the icon and select Update Driver
- Follow the steps and finish the installation
Now, restart your PC and it should fix the problem.
If the above method not working, then you can uninstall the sound driver and install a fresh driver.
Solution 2 – Disable Enhancements
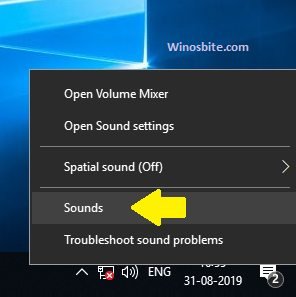
The first solution is to “disable all enhancements” in the playback devices option you would get on the sounds window by right-clicking on the speaker icon on your system.
- Right-click on the speaker icon located on the bottom right-hand side.
- Click on Sounds
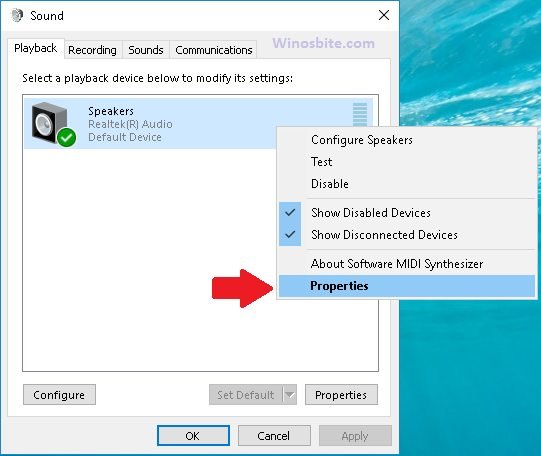
- Now, click on the Playback tab from the top
- Right-click on Speaker showing and click on Properties
- Now under the Enhancements tab, select the radio button that says Disable all sound effects.
- Click on Apply followed by OK
Now, restart the PC to take effect.
Solution 3 – Disable Volume Adjustment
The third option to resolve this issue is to opt for the optimum frequency suitable for your system speakers or your headphones, i.e. either lower it or increase it accordingly by trial and error method.
- Right-click on the speaker icon and click on Sounds
- Select Playback devices
- Click on the Communications tab
- Select radio button says Do Nothing
- Click on Apply and OK

Now, restart the computer, hopefully, the problem is solved.
Solution 4 – Change the sample rate and bit depth
You can choose the sample rate (Frequency) and bit depth to be used when running in shared mode. Sometimes, an incompatible frequency and bit depth cause errors related to audiodg.exe. Follow the steps below-
1. Right-click the speaker icon and go to Sounds
2. In the playback tab, go to your Speaker’s properties as we did in Solution 2
3. A new speaker properties window will open, head over to the Advanced tab
4. Try out a higher sample rate (Choose one and then click the Test button)
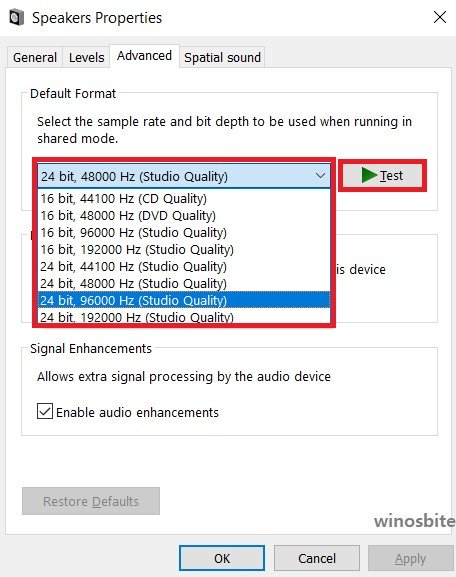
Choose different rates and test it out to see which one suits you the best
5. You can also try a lower sample rate if the problem is still occurring.
Solution 5 – Use the SFC command
As audiodg.exe is a System32 file, we can always use the System File Checker (SFC) command using PowerShell or command prompt to fix issues related to it.
1. Press Windows + X and click on Windows PowerShell (Admin) (or you can also search for PowerShell/Command Prompt in the start menu and run it as administrator)

2. In the command line, type sfc /scannow and press ENTER to run the SFC command
3. Let it finish; It will automatically repair a corrupted/damaged/missing audiodg.exe.
Conclusion
I Hope, above method, will solve the high CPU usage caused by Audiodg.exe. If you know any other tricks to fix this issue then please let me know.


