
Wondering how to start the Disk Management using shortcuts in Windows 7, 8 or 10? Use 07 ways to open the Disk Management in less than 1 minute. Usually, you want to open the Disk Management tool to perform few specific tasks like partition a particular hard disk or rename or simply format a drive.
What is Disk Management?
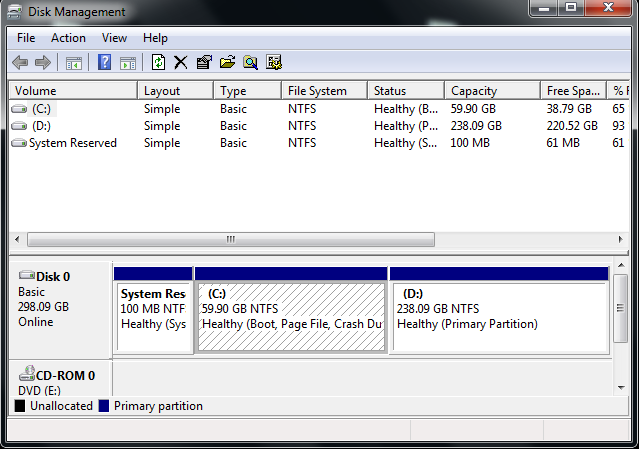
There are many Microsoft Windows utilities available and Disk Management is one of them. Formerly, it was presented in the form of an alternative for a command named the fdisk command, used in Windows XP. This Windows utility allows you to check and administer hard disks which are already installed in your PC. Moreover, it also manages the partitions linked with the drives.
With this tool, Windows users can initialize disks, and they can also create and format volumes, etc. Every contemporary version of Windows incorporates this utility. Let’s have a look at how to open it in Windows 10, Windows 7, and Windows 8.
Quick Overivew
How to open Disk Management?
On the Windows system, there are no shortcuts available to access Disk Management. There is no provision of shortcut either on the desktop or on the Start menu. The reason for this is it is actually not a program. It is important to note that Windows users can open the Disk Management tool irrespective of the Windows versions they use.
They can open Disk Management in Windows 10, Windows 8, Windows 7, Windows Vista, and Windows XP. The time required to open it is just a few minutes. Let’s have a look at different ways to open it:
1. Use the Run Window (supported in all the Windows versions):
This method is considered one of the easiest and quickest to open the Disk Management Utility tool. It is supported in all the Windows versions from Windows 10, 8, 7 to XP. It only involves a few steps which remain the same in every Windows version.
For open the Disk Management on your system, kindly follow these steps:
- Click “Start” button on the Windows task-bar.
- Type ‘Disk Management’
- A quick result will appear, click over ‘Create and format hard disk partitions’.

Hurry, you are done:
2. Use Windows Shell or Command Prompt
It supported in all the Windows versions. In this method, you have to access command prompt or PowerShell in the search field of the taskbar. Follow these steps:
- Click on Start button
- You will see a command prompt window.
- Now type the command: diskmgmt.msc and press Enter. The Disk Management utility tool will now pop up.
- Your Disk Management tool will open.

3. Open Disk Management in Computer Management
This method supported in all windows version.
On your Windows OS, initially you click on Desktop from the Start menu. When you enter into the desktop, you click on the folder icon show over the lower left corner. Now inside the Libraries window, choose Desktop under Favorites.
- After that, just right-click Computer and select Manage option inside the context menu.

- You will see the option of Disk Management on the left-hand side, select it.
- Once the Computer Management interface initiates, you will be able to see Disk Management on the left list.
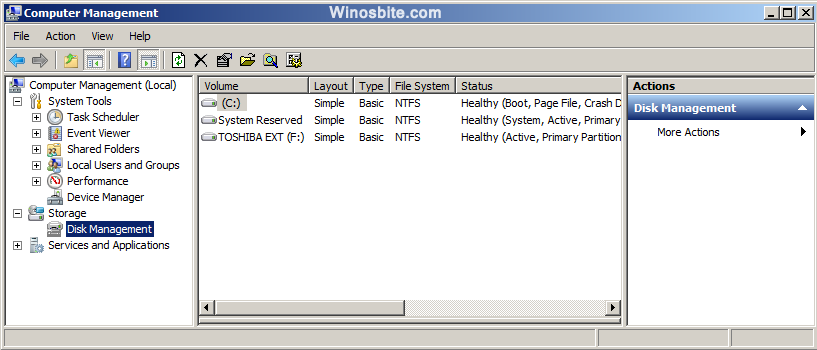
The method is easy to use; therefore, the majority of Windows users prefer to use it.
Also learn how you can disable f1 key to speed up you productivity.
4. Use the Control Panel (Windows 7 and 8):
Initially, you need to click on “Start” and then navigate to “Control Panel”
Now choose the “System and Security” options and from that, you have to choose “Administrative Tools”.

It happens that on your Windows 7 and Windows 8, you have the icons view instead of the category view.
In that case, directly navigate to “Administrative Tools.” Now open “Computer Management.”
After that, click on “Disk Management” option shown inside the column over the left side, situated under Storage. Finally, the Disk Management utility opens up in the middle part of the screen.
5. Launch it using Create and Format Hard Disk Partitions
Supported in all the Windows version
In this method, click on Start Menu on the Windows and search “partition” inside the Control Panel.
Now select Create and Format Hard Disk Partitions.
6. Use the Quick Access Menu
In Windows 10, you need to right-click on the bottom-left corner. A menu will launch on the desktop and from that open Quick Access Menu. From that select Disk Management. You will observe that the tool opens now.
7. Use the direct search
It works only on Windows 10. Type this disk manage inside the search box from the taskbar. Now select Create and format hard disk partitions from the result shown. Hurry, you the option now!


