
Hibernation in the context of Windows 10 is a state you can place your PC in as opposed to putting it to sleep or shutting it down. The feature of Hibernation is planned fundamentally for laptops, and probably won’t be accessible for all Windows computers and more especially PCs with InstantGo do not have the feature of Hibernation.
You won’t find the Hibernate mode option by default in Windows 10, but you can easily enable it using a manual method and command prompt.
Quick Overivew
Why do you need to enable the Hibernation feature?
Windows users enable Hibernation because just before the event when the PC goes into the state of hibernation and prior to shutting down, the PC takes a preview of its drivers and framework records, and then the PC saves it in the hard drive. As a result, your PC boots up quicker, on the grounds that it doesn’t have to restore those previous records and settings.
Moreover, the feature of Hibernation is enabled as a default but does not show in Start/Windows menu. However, it does not cause any trouble to your system and so there will be no issues even if you do not disable (in case if you are not using the Hibernation feature) it.
Why do you need to disable the Hibernation feature?
Well in case the Hibernation is enabled then it generally occupies a significant portion of your computers RAM. More specifically the hiberfil.sys file will occupy about 75 percent of your PC’s introduced RAM. For instance, in case you have 8GB of RAM, the hiberfil.sys document will take up 6GB of your RAM; if you have 16GB of RAM, your hiberfil.sys record will take up 12GB.
Note: The hiberfil.sys is located in the root folder where your Windows 10 operating system is loaded.
In this way, the Windows users who prefer to disable the Hibernation feature, do it because they truly need those additional gigs of hard drive space back. Hence you also might consider disabling it and as a result, you would not be able to utilize the feature of Hibernation.
How to enable Hibernate in Windows 10?
1) Press the Windows button, type Power and Sleep, and click on it

2) Click on Additional power settings located on the right-hand-side

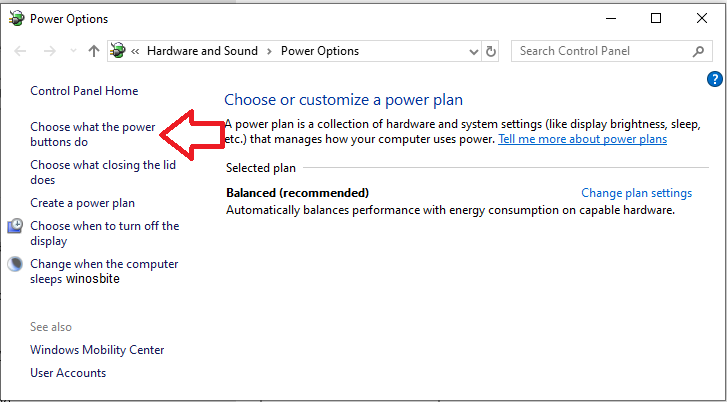
3) Now, click on Choose what the power buttons do from the left-hand sidebar
4) Click on Change settings that currently unavailable as shown below:

5) Now check-box button will be enabled, click on Hibernate (Show in Power menu)
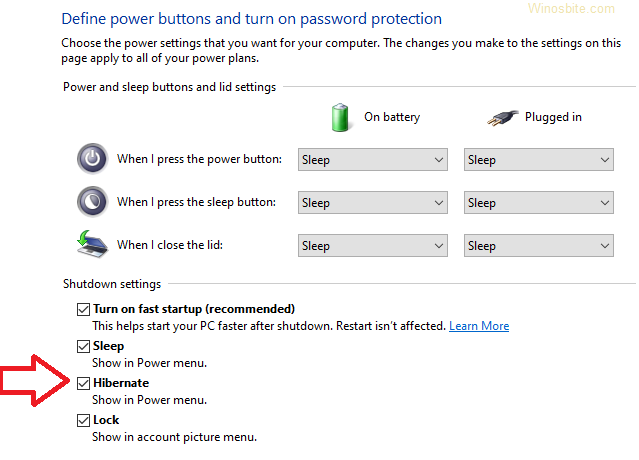
6) Click on Save Changes
This will allow you to enable the Hibernate option.
How to disable Hibernation using command prompt?
Follow the steps below so as to disable the Hibernation feature.
Step 1. Press the Windows button from your keyboard.
Step 2. Now type cmd and choose Run as administrator option as shown below

Step 3. Now type or copy the command powercfg.exe /hibernate off‘ and hit the Enter key:

Step 4. Now exit the Command Prompt application by typing the command exit, and then hit the Enter key.
Well, that’s it, I hope after this the Hibernation feature will be disabled from your Windows system.
How to re-enable Hibernation by Command line?
Step 1) Press the Windows button from your keyboard.
Step 2) Now type ”cmd” and then right-click on the Command Prompt icon and select Run as administrator.
Step 3) Now type or copy the command ”powercfg.exe /hibernate on” and hit the Enter key.

Step 4) Now exit the Command Prompt application by typing the command ”exit”, and then hit the Enter key.
Well, that’s it, I hope after this the Hibernation feature will be enabled.
Conclusion: I hope you can get what is the Hibernation feature of your Windows 10 operating system and I hope you find my article interesting and valuable. Thank you for reading my article.
Please write me a comment if you face any issues regarding the Hibernation feature.


