
You may often compress a file, especially the huge ones before transferring or say sharing the files. The compressed file version is usually low in size compared to the original file. However, to extract such a compressed file, we often use the file compression functionality like Winzip. And in case if you are one of those who are encountering errors while extracting the files, then this article will help you successfully diagnose the error.
When a user tries to extract the compressed file then its shows an error message that says “Windows cannot complete the extraction The destination file could not be created”
This error may appear on Windows 10, 8, or 7. It may also show an error message like “The destination path is too long” when you were trying to extract the file.

What can be the possible reasons behind the unsuccessful extraction?
Well, there can be several reasons for which Windows cannot complete the extraction. Some of the important ones are as follows:
- The compressed file might be a corrupted one.
- The compressed file may be in a secured location inside your Windows system.
- It very well may be a result of software conflict during the extractions process.
- Due to the very long name of your compressed/zip file.
Just because of such reasons you may eventually end up encountering irritating error messages.
Quick Overivew
Methods to Fix Incomplete Extraction Process
I have briefed down some of the easy-to-implement methods, implementing any of these methods can help you to get your desired extracted file.
By Restarting the Computer
Sometimes the incomplete extraction problem can be fixed by just restarting the system. This is usually a temporary issue that can be fixed by rebooting your system.
This should fix the issue, if not then follow the next method.
By Running SFC Scan
By performing an SFC scan of the corrupted system files you can easily fix such corrupted files. In order to run an SFC scan follow the steps referenced below.
- Press Windows + R key
- Now type cmd.
- Now press Ctrl + Shift + Enter
- Now in elevated cmd type or just copy the command sfc /scanow.
- Press the Enter key to execute the application
That’s it, now wait until the scanning process is completed. Eventually, after the scanning is completed, try to extract the file, hopefully, you would not receive any error.
In case if the error still persists then you must implement the next method.
Move Zip/Compressed file to Another Location in PC
Moving the compressed file works to somewhere else in the PC works in the cases when you get the extraction error just because the compressed file is present in the protected/secured location of your PC. Hence just move the file to a different location in your PC then try to extract the zip/compressed file.
Renaming the Long Filename
Many times a user gets an error message saying “path is too long or file name is too long’”, in such cases it is suggested to just rename the file name to a shorter file name. So just rename the file name and then try to extract the compressed/zip file.
Try Another Extract Software
If you are using the system default zip tool or Winzip then you may try other free file compression software.
There are several such good zip software like:
- WinRAR
- 7-zip
- PeaZip
Perform a Clean Boot
If none of the methods work and you are still unable to extract your compressed/zip file, then performing a clean boot is your last recommended method. Here are the steps:
1. Press the Windows + R
2. Now type MSConfig and hit Enter, to open System Configuration.

3. Now select the third option saying Selective Startup.
4. Next, uncheck the box of Load Startup Items as shown below.
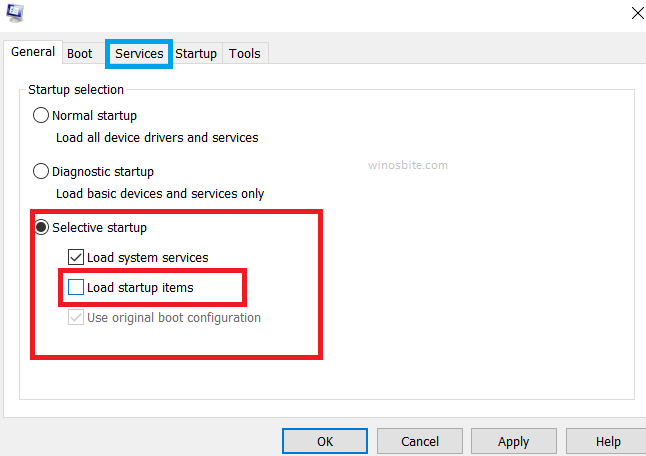
5. Next click on apply button.
6. Now switch to the Services
7. Uncheck the box of Hide all Microsoft services and then click on Disable all button as shown below.
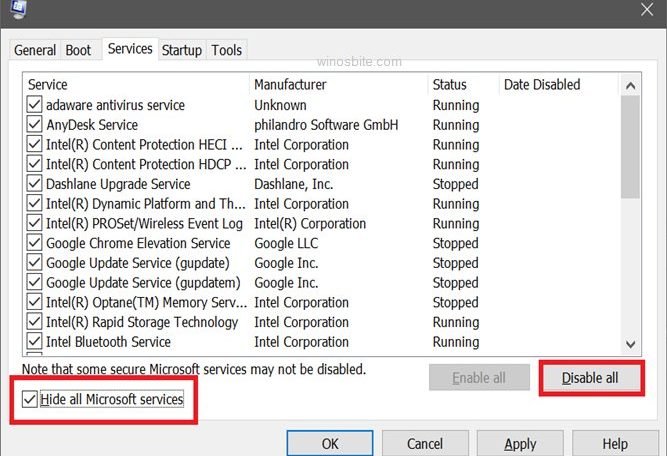
8. Now click on Apply button and then click on the Ok button.
That’s it, now restart your Windows System and hopefully, your problem will be resolved.
I am hoping my article helped you in successfully extracting your desired compressed. For any kind of extra information or help, you are always welcome to comment below and reach to us.
Read next:

