
intelppm.sys is a driver file owned by Microsoft Corporation. intelppm stands for ‘Intel Processor Power Management’, which is a .sys file designed for devices with intel components/hardware. A .sys file format stores compiled system resources like configuration variables and settings required by Windows and DOS (Disk Operating System). This is a crucial system file required for the proper and stable functionality of Windows.

In this article, we will learn some basic information about the file and some simple methods to fix errors related to intelppm.sys.
Quick Overivew
Properties
This file is basically a driver and located under C:\Windows\System32\drivers directory. Here is more detail:
| File Name: | intelppm.sys |
| File Size: | 218 KB |
| File Location: | C:\Windows\System32\drivers |
| Publisher: | Microsoft Corporation |
| File Description: | Processor Device Driver |
Uses of the file intelppm.sys
intelppm.sys is a processor driver file. This means that it contains configuration data and resources that are required for the smooth working of your intel processor.
According to its name, it is a processor power management driver file so it might also be responsible for the power-saving features like selective suspend or underclocking the frequency.
Is it safe or a virus?
The file intelppm.sys is completely safe and trustworthy. It is published by Microsoft Corporation and has a valid digital signature too. Intelppm is also an important component of Microsoft Windows and without it, your PC may experience instability and system crashes.
As a .SYS file, the chances of intelppm.sys being a virus program is very less as it cannot execute like a program executable. To verify that its not a virus program, you can check whether its file location is C:\Windows\System32\drivers or not by going into its properties. Also, you can verify whether it has a valid digital signature or not by going into the Digital Signatures tab in the file’s properties.
Common Error
The most common error faced by Windows users regarding the file intelppm.sys is the BSoD (Blue Screen of Death).
BSoD is an irritating error that causes the system to crash mid-session and the user may lose work or data. A BSoD error in Windows 10 comes with the following message-
“Your PC ran into a problem and needs to restart. We’re just collecting some error info, and then we will restart for you.”
This error is caused by a corrupted or damaged intelppm.sys file or a third-party process interfering with the system file.
You may also see below error:
DRIVER_IRQL_NOT_LESS_OR_EQUAL (intelppm.sys)
Let’s find out how to fix this issue.
Methods to fix BSoD error
If you are receiving intelppm.sys BSOD errors on your Windows 10 PC then follow the below method to fix it like updating the device driver, clean Windows boot, Resetting the PC.
NOTE: If you are using some sort of overclocking software for your CPU like Intel Xtreme Tuning Utility or Ryzen Master, I will advise you to uninstall the overclocking software and see if the problem is resolved before proceeding to these methods below.
Performing a clean Windows boot
A clean boot refers to the startup when no other services except Microsoft Windows ones are running. This ensures that no third-party application is interfering with the system services like Intelppm. Follow the methods below to perform a clean boot-
1. Open System Configuration application by searching for it in the start menu

2. Turn on the ‘Selective startup‘ option disable ‘Load startup items’ then proceed to the Services tab

3. In the services tab, check the ‘Hide all Microsoft Services’ checkbox, then click on disable all

4. In the Startup tab, click on Open Task Manager
5. In the task manager, go to the startup tab and disable all of the startup items

6. Restart Windows; If the BSoD issue doesn’t arise, it means that a third-party service was the cause of this error.
You should uninstall the third-party applications that are suspected of interfering with intelppm.sys.
Run SFC and DISM scan
As intelppm.sys is a system driver file, performing an SFC and DISM scan would be a wise choice as they can automatically detect and repair damaged system files and Windows image. As for a severe BSoD case, you won’t be able to boot up Windows at all, so I am also including a separate method for that in this section.
A) If you can boot up Windows-
1. Search for command prompt in the start menu and run it as administrator

2. Type or paste sfc/scannow in the command line and press ENTER; This will run the system file checker

3. After SFC scan is finished, type or paste
DISM /Online /Cleanup-Image /RestoreHealth
Press ENTER to run DISM repair and wait for a few minutes for it to be successfully finished; Close the command prompt and see if the problem is resolved.
B) If you can’t boot up Windows-
1. Force reboot your PC 3 times (Switch on your PC and let the BSoD screen restart the PC; Let this happen 3 times)
2. You will enter the boot options screen; Click on Troubleshoot
3. Click on Advanced options and choose Command prompt from the list of options
4. Enter the SFC and DISM commands [refer to method 2 (A)].
Fix intelppm using registry
I would suggest taking the registry backup before you proceed this, just for safer side:
1. Press Windows + R to start the run application
2. Enter regedit in the text field and press OK to open the registry editor

3. Go to the following location by pasting this directory in the text field at the top of the registry editor Window
HKEY_LOCAL_MACHINE\SYSTEM\CurrentControlSet\Services\intelppm
4. Double-click the Start DWORD file to open its properties
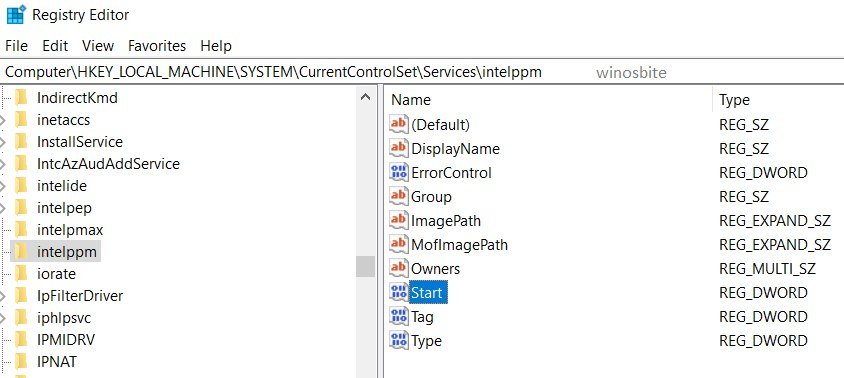
5. Change it’s value data to 4 (Leave it as it is if it’s already 4)

6. Restart your PC and the problem should be resolved.
Reset your PC to reinstall the system files
This is our last choice if the problem hasn’t been resolved. Resetting PC is basically equal to reinstalling Windows without losing data and settings and this process takes a considerable amount of time.
A) If you can boot up Windows-
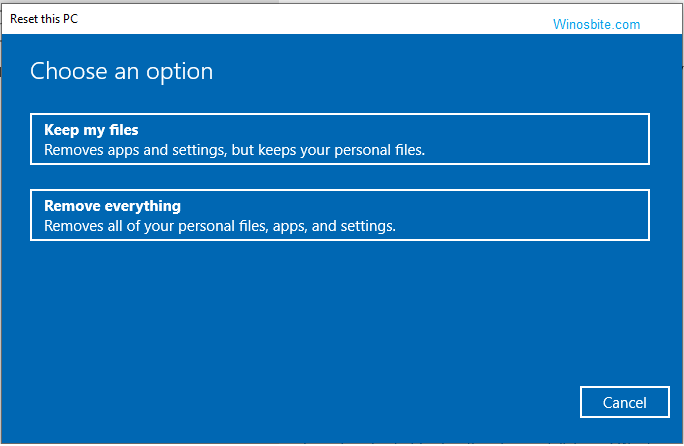
1. Search for Reset This PC option in the start menu and open it

2. Click on the button that says ‘Get Started‘
3. In the next blue Window, we will have two choices; Select Keep my files and let the reset process start.
B) If you can’t boot up Windows-
1. Force reboot your PC 3 times (Switch on your PC and let the BSoD screen restart the PC; Let this happen 3 times)
2. You will enter the boot options screen; Click on Troubleshoot
3. Click on Reset this PC option
4. Select Keep my files.
Conclusion
That was it for the methods to solve this issue. In case you have suggestions or queries, contact us or leave a comment down below.

