
A genuine Iphlpsvc file belongs to the Windows OS that is mainly used to provide IPv6 connectivity features over an IPv4 network. However many users have noticed that iphlpsvc.exe is consuming high memory or CPU resources in Windows 10 and 7.
iphlpsvc.exe performs a very important service and runs few critical tasks on the Windows system that is required to connect the system to the internet, hence you must not try to disable it without proper cause. To know more about iphlpsvc.exe, why it is useful, and how to disable it, you must read all the sections of this article.
Quick Overivew
What is iphlpsvc.exe?
In short, Iphlpsvc is referred to as the Internet Protocol Helper Service that is required on every Microsoft Operating System to connect to the internet. It helps those systems that are using IPv4 networks but want to use IPv6 connectivity.
The Iphlpsvc is a windows 10 legit file and it comes preloaded with it. It is responsible for recovering and modifying the available network setup settings in Windows 10. It also successfully permits internet connection that happens across different Windows 10 protocols like Port Proxy and IPv6. And this is the reading why it’s consuming your Internet Data.
You may find iphlpsvc.dll file under C:\Windows\System32\ folder.
File Size and Location
Iphlpsvc.dll can be found in the C:\Windows\System32 and C:\Windows\WinSxS\ folder too. The average file size of Iphlpsvc usually around 813 KB.

Quick Overview
| File name: | iphlpsvc.dll |
| File description: | Service that offers IPv6 connectivity over an IPv4 network |
| File size: | 812 KB |
| File type: | Application extension |
| File version: | 10.0.18362.476 |
| Product name: | Microsoft Windows Operating System |
| Language | English |
| Copyright: | Microsoft Corporation |
Can I Disable Iphlpsvc?
When it comes to any Windows Service such as IPHLPSVC, it is generally recommended that you do not disable it as it is mainly used for processing the tunnel protocol. This protocol prioritizes encryption in its communications, so if you still feel the need to disable it, you will lose out on enhanced browsing.
However, if Iphlpsvc.dll file is using a high CPU or Ram then you may consider disabling it.
Here is command line to check IP address.
Why iphlpsvc is consuming high CPU/Memory?
Many users have complaint that iphlpsvcs.exe using huge amount of CPU and memory on continuous basis. And it start using the memory as soon as they connect to the internet. However, this happen rarely. If you are also facing similar issue then keep reading the post.
However, since it is a Windows file there is nothing much to worry about. It usually consumes very little of your CPU resources and hence I would suggest not disabling it.
Can I disable Iphlpsvc?
Well disabling the Iphlpsvc service will not harm your Windows PC, however, if you disable it, you will not be able to use the Ipv6 network protocol. Perhaps there will be no problems or disturbance while performing simple tasks like gaming, web browsing, etc. In case you still want to disable the Iphlpsvc, then you must read the next section.
Methods to disable Iphlpsvc.exe from Windows 10. Same process can be followed for Windows 7 as well.
Method 1: By disabling the IPHelper service
In order to disable Iphlpsvc from Windows 10 follows the steps mentioned below.
1. Press the Windows Button.
2. Now type Services and then click on the icon as shown below.
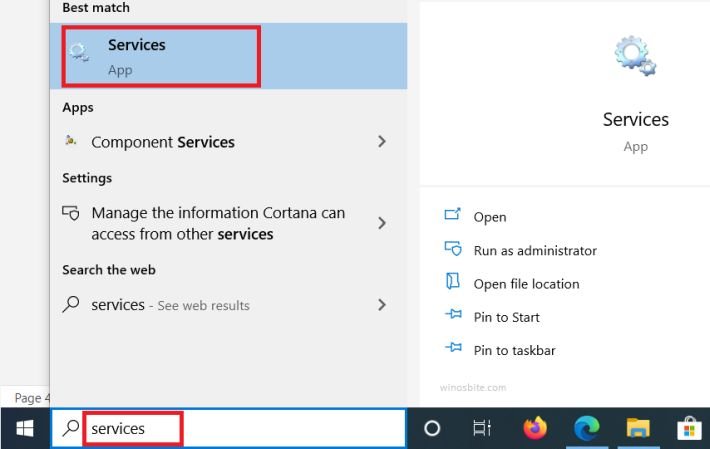
3. Now you will be seeing a list of Services running in your system, just find the Ip Helper among the list.
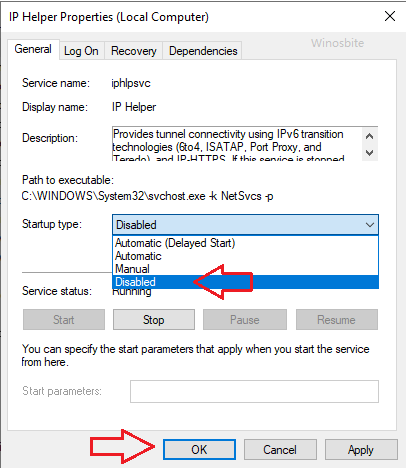
4. Now, right-click on Ip Helper and select Properties
5. Next, under the Service status section, click on Stop.

Note: The Ip Helper service may start again once you reboot your system.
6. Now if you do not want the Iphlpsvc to restart then, select the Startup type to Disabled.
7. Now click on the Apply button and then click on the Ok button.

That’s it the Iphlpsvc is hopefully disabled from your Windows 10 system.
This is only a temporary disabling, and it will hold until you reboot your system.
So, if you want to disable Iphlpsvc on a permanent basis then follow below steps:
- Right-click on IP Helper, and select Properties.
- From the Startup Type menu, click Disabled and select Apply to save the change.
Method 2: By using the Windows Registry Editor Application
In case of method 1 does not help you, you must continue with this method. Here is what to do.
1. Press the Windows Button.
2. Now type Registry Editor and then click on the icon as shown below.

3. Next, navigate to HKEY_LOCAL_MACHINE\SYSTEM\CurrentControlSet\Services\iphlpsvc
4. Now right-click on the Start key and select Modify.

5. Now change the value data from 2 to 4.
6. Click on the OK button.

7. Close the Registry Editor.
8. Now finally restart your system.
Method II: Restart the service
- Type Services.msc in the Windows Search bar and hit the Enter key
- Once you have opened the Services window, locate IP Helper and right-click to open the context menu.
- Now, here select Properties and choose Automatic in the Startup Type.
- Click Apply to save the change.
The Automatic option in the Startup Type menu means that the service will resume as soon as your system is booted. However, if you want a faster boot time, you can choose the Automatic (delayed start) option from the same menu. This delays the initiation of the IP Helper at start-up by a minute or so, allowing your system to process less and boot quicker.
That’s it, now the Iphlpsvc service is disabled, and hence you will no longer see Iphlpsvc.exe running in the background.
Other similar processes:


