
Windows ink is a feature of Microsoft Windows 10 that lets you use a digital pen or your finger to draw or write on your PC. Obviously, this feature is only available on devices with touch-sensitive screens like a convertible laptop. This is quite a useful feature that is easy to use and handy especially for an art professional or a student.
Do you want to enable or disable Windows ink? Follow the below steps to learn some simple methods to do it.

Quick Overivew
Is it safe to disable or enable Windows ink?
Yes, it is perfectly safe to disable or enable Windows ink. Windows ink is a feature introduced by Microsoft in Windows 10 anniversary update in 2016. As it is an additional feature, it doesn’t matter whether you keep it on or turn it off. Also, enabling or disabling this feature will not affect your PC’s performance or functionality in any way.
Below are the methods to enable or disable it on your PC.
Methods to enable or disable Windows ink in Windows 10
Using local group policy editor (If you are using Windows 10 pro version)
If you are using Windows 10 pro, you should have the group policy editor application. This is the easiest method to disable windows ink in Windows 10.
1) Press Windows + R to open the Run Command
2) Type gpedit.msc in the text field and press ENTER

3) Navigate to the following directory in the left pane
- Computer Configuration ->Administrative Templates ->Windows Components ->Windows Ink Workspace
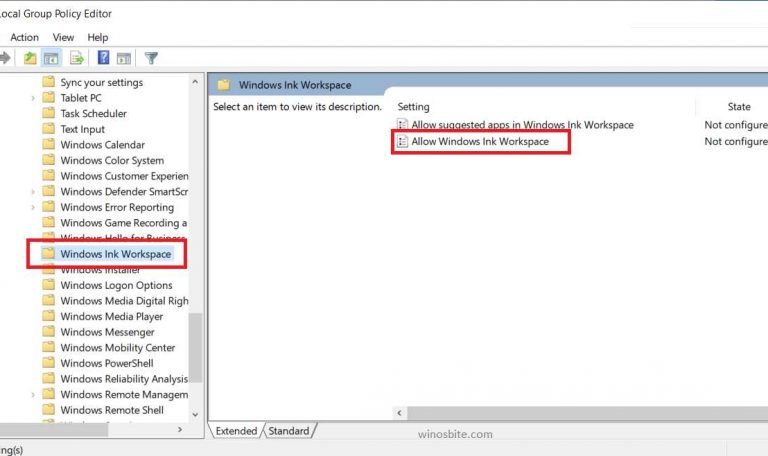
4) Now, in the right panel, open Allow Windows Ink Workspace
5) Select
- Enabled and ON if you want to enable it
- Disabled if you want to disable it
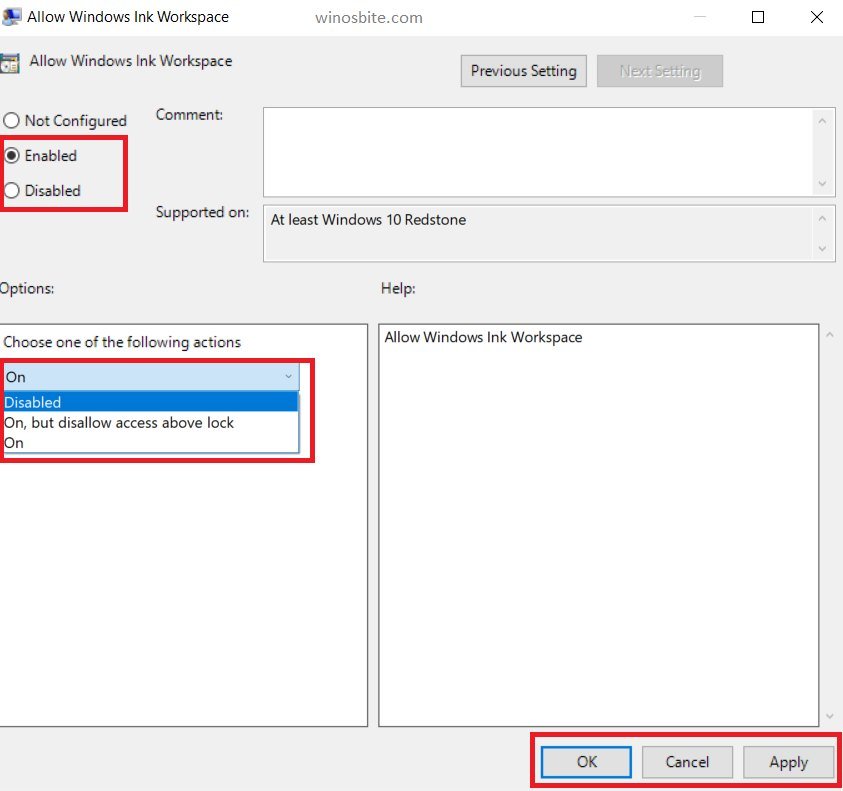
6) Apply the changes and exit the application.
If gpedit.msc is not present on your system, you might be using Windows 10 home instead of Windows 10 pro. Don’t worry, follow the method below to disable permanently or enable Windows ink on Windows 10 home.
Check how to disable gamebarpresencewriter on Windows 10 pc.
Using the Registry Editor
1) Press Windows + R to open the Run application
2) Type regedit in the text field and press ENTER to open the Registry editor

3) Go to the following location by entering the following directory in the text field at the top (or manually locate it)
- HKEY_LOCAL_MACHINE\SOFTWARE\Policies\Microsoft\WindowsInkWorkspace
If the WindowsInkWorkspace folder doesn’t exist, then right-click on Microsoft folder in the registry and create a new key by clicking on New->Key. Name the key as WindowsInkWorkspace.
4) Open the WindowsInkWorkspace key and right-click in the main panel -> New -> DWORD (32-bit) file and name it as AllowWindowsInkWorkspace (IGNORE THIS STEP IF AllowWindowsInkWorkspace WAS ALREADY PRESENT)

5) Double-click AllowWindowsInkWorkspace to open it and set its value data to 0 (for disabled) or 1 (for enabled), then click OK

6) Close the registry editor, then restart your PC.
Conclusion
That was it for the methods to enable or disable Windows ink feature on Microsoft Windows 10. In case of any queries or suggestions, don’t mind leaving a comment down below or contacting us.

