
It’s easy to fix Video Scheduler Internal Error. I have shown Eight ways to fix the VIDEO_SCHEDULER_INTERNAL_ERROR on Windows 10. This error mostly appears on screen due to the Graphic card driver issue. When this error message shows then the system usually hangs for a few seconds and does not allow to work on to the computer.

Stop error code 0x00000119, also known as Video Scheduler Internal Error occurs mainly due to conflicts between the system graphics card, it’s drivers and Windows 10 operating system. This error comes with a Blue Screen of Death (BSOD) error that indicates that something goes wrong with the video scheduler.
Let us look at a few methods to fix this error:
Quick Overivew
Method I: Using Disk Cleanup
1) Go to My Computer
2) Select Local Disk (C:) and right-click on it.
3) Select Properties from the drop-down menu
4) In the Properties window, open the General tab and click on Disk Cleanup under the “Capacity” heading.

5) Then select OK
6) Once the Disk Cleanup is done calculating the space you will be able to free on C drive, the Disk Cleanup window will appear. In that, click on Clean up system files under Description.

7) In the new window that appears under Disk cleanup, check every box under Files to delete and select OK.

8) The disk cleanup process will begin. Once, finished, reboot your system.
Method II: Scanning & Fixing the Registry
1) Click on the Start button and type Command Prompt
2) Right-click over it and choose Run as administrator

2) If “User Account Control” dialogue box appears, select Yes
3) Once the command prompt window opens, type below command and press Enter
sfc /scannow
4) Then, Restart your computer. This will fix any corrupt files.
Method III: Uninstall Graphic card driver
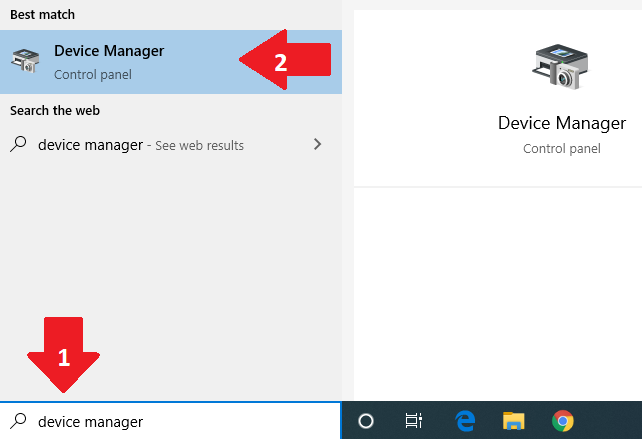
1) Type Device Manager in the search bar in the bottom left corner of your screen and press Enter.
2) In the Device Manager window, double click to expand “Display Adapters” from the list of devices.

3) Right-click on the NVIDIA / Intel(R) HD Graphics graphic card under “Display Adapters” and select “Uninstall device” in the pop-up menu.
4) Click on “Yes” if the uninstallation confirmation message appears.
5) Now open Control Panel and click on Uninstall a program under Programs section.
6) Now, search for all programs related to NVIDIA and right-click on each of them.
7) Select Uninstall from the pop-up menu.
8) Now, reboot your system to save the new settings.
Once done, go to the website of the ‘NVIDIA‘ / ‘Intel(R) HD Graphics’ graphic card manufacturer and download a new setup for the same.
Once downloaded, install the driver again in your system.
Method IV: Scan the system using Anti-Virus software
1) Click on the search bar at the bottom left corner of your screen and type Windows Defender Security Center and click on it.
2) In the Windows Defender Security Center, click on Virus & threat protection section
3) Make sure it’s Turn On
4) In the virus & threat protection window, click on the Quick Scan button.

This will start doing a computer scan and fix the video scheduler’s internal error.
Method V: Using Checkdisk
1) Click on Start button, type Command
2) Right-click over it and choose Run as administrator
3) If User Account Control dialogue box appears, select Yes
4) Once the command prompt window opens, type below command and press Enter
chkdsk /f /r
Press Y when the error message saying the scan cannot be done until system restarts appear.
Then, restart your computer. This will check and fix any hard disk related issue that is causing the error 0x00000119.
Method VI: Using Deployment Image Servicing and Management (DISM)
1) Click on the Start button, type Command Prompt
2) Right-click over it and choose Run as administrator
3) Once the command prompt window opens, type:
Dism /Online /Cleanup-Image /StartComponentCleanup
and press the Enter key.
4) Then type below command and press Enter
Dism /Online /Cleanup-image /Restorehealth
5) Once, the restore operation is successfully completed, type below command to check the system integrity.
Dism /Online /Cleanup-Image /CheckHealth
Restart your system to save the settings.
Method VII: Update Graphic Card Drivers
1) Press the Windows logo and X keys together
2) Now, select Device Manager from the pop-up menu.
3) In the Device Manager window, double click to expand Display Adapters from the list of devices.
4) Right-click on NVIDIA / Intel(R) HD Graphics graphic card and select Enable
5) Then right-click on NVIDIA graphic card again and select “Update Driver Software” in the pop-up menu.
When the message “How do you want to search for driver software” appears, select “Search automatically for updated driver software“. If this does not repair the issue then select “Browse my computer for driver software” option.
Then, click on “Let me pick from a list of device drivers on my computer” and click on “Next”
This will display a list of drivers for your Nvidia Graphic Card. Select the one compatible with it and click on “Next”.
Once done, reboot your system to save the settings.
Method VIII: Update Windows
1) Press the Windows logo and I keys together
2) Click on “Update & Security”

3) Then, click on “Check for updates” under the Update status
4) If any updates are available, install them.
Restart your system.
Using the above method you can easily Fix Video Scheduler Internal Error, however, if you are still facing any error then do let me know by leaving your comment below.

