
Sometimes it happens that the brightness control stopped working on a desktop or laptop. I have mentioned how to fix brightness control not working issues on Windows 10. Although Microsoft Windows is the most used operating system in the world, it can never be 100% stable due to the variety of hardware it is running on. Time to time, Windows users encounter minor bugs in the operating system. One of the most frustrating bugs is when we can’t control the brightness of the display and its stuck at an uncomfortable brightness level.
Don’t worry, this article will ensure that the brightness related issue on your PC is fixed by providing you some very simple methods.
Quick Overivew
Methods to solve the brightness control issue
Fast and Temporary fixes
You can try these temporary fixes if you are in a hurry. If you have a few minutes to spare, feel free to skip this section and head over to the permanent fixes.
- Use the physical button on your Monitor (If you are using a desktop): Take help from the instruction manual or online by searching for your Monitor model. Although it is very easy to control brightness using the physical buttons.

- Restart your PC: When I personally experience this issue, I usually just restart my laptop as it is quick and works every time. The cause of this issue is variable, but restarting your PC resets the services and loads drivers again which fixes the issue most of the time.
Permanent fixes for Brightness Control issue
Try these methods if the brightness control not working issues are very frequent on Windows 10 system and you want to get rid of it once for all.
Disable Enable Device
It happens sometimes that disabling the Display Adapter and Enabling it back fix the issue on a permanent basis.
1) Click on the Windows logo, type Device Manager, and click on it.
2) Click on Display Adapter
3) Right-click on Intel (R) HD Graphics and choose Disable device

4) Wait for few seconds and then again right-click over Intel(R) HD Graphics
5) Now choose to Enable
This will fix the Brightness Control issue on your desktop computer.
Running Windows troubleshooter
Windows Troubleshooter identifies and fixes problems automatically. Whenever you are experiencing any bugs or issues with Windows, it is a good practice to run Windows troubleshooter first. To do that, follow the steps below-
1. Press Windows + I simultaneously to bring up Windows Settings
2. Go to Update and Security

3. Click on Troubleshoot in the left panel and among the list of troubleshooters, run the one called ‘Hardware and Devices’
4. If you can’t find the troubleshooter, click on Additional Troubleshooters and run the Power troubleshooter.

Make sure that Adaptive brightness is turned off
Adaptive brightness is a feature that makes your display automatically adapt to the surrounding luminosity and adjust the brightness itself. This feature is present in high-end laptops with light sensors. There is a chance this feature is not working as expected and causing issues with the brightness control.
1. Press Windows + R simultaneously to open the Run application
2. Type in powercfg.cpl in the text field

3. Click on Change plan settings under the ‘Choose or customize a power plan’ option

4. Click on Change advanced settings

5. Look for +Display option in the list of options and expand it by clicking the + icon
6. Turn off the ‘Enable Adaptive Display’ setting (Expand the option and Turn off both: On Battery and Plugged in)
7. Click Apply then OK.
Update your display adapter driver
An outdated version of the display adapter (or Graphics card) in your PC can cause brightness control to stop working. Follow the steps below to update your display adapter driver.
1. Press Windows + R simultaneously to open the Run application
2. Type in devmgmt.msc and press ENTER

3. In the list of devices, look for Display Adapters and double click on it to expand it
4. Right-click on the first adapter (depending on the configuration, your PC can have multiple graphics card) and click on Update Driver
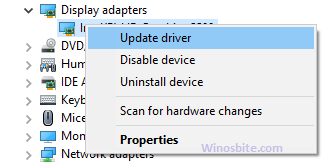 5. Click on ‘Search automatically for drivers’ and let the device manager install the update for your display adapter; See if the problem persists.
Reinstall the Graphics Driver
If method 2 above shows a message like “The best driver software for your device is already installed ” and the problem still persists, we can try reinstalling the driver software so that the driver files are replaced with new ones if they were corrupted or damaged.
1. Expand the list of Display Adapters like in method 2 above (follow up to step 3)
2. Right-click the first graphics card in the list and click uninstall
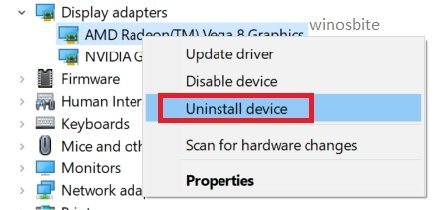
3. In the warning message, click the Uninstall button and the software will be removed
4. Restart your PC and Windows will automatically install the driver for the display adapter.
Use the Microsoft Basic Display Adapter
If none of the options above worked, it means that your Display adapter is malfunctioning. For the time being, you can use the in-built Microsoft Display adapter (Keep in mind that the display may look blurry as the highest possible resolution for Microsoft Basic Display adapter is 1280*1024).
1. Go to the display adapter as we did in Method 4 and right click your GPU then click Update Driver (follow up to step 4)
2. Click on ‘Browse my computer for driver software’
3. Click on ‘Let me pick from a list of device drivers on my computer’
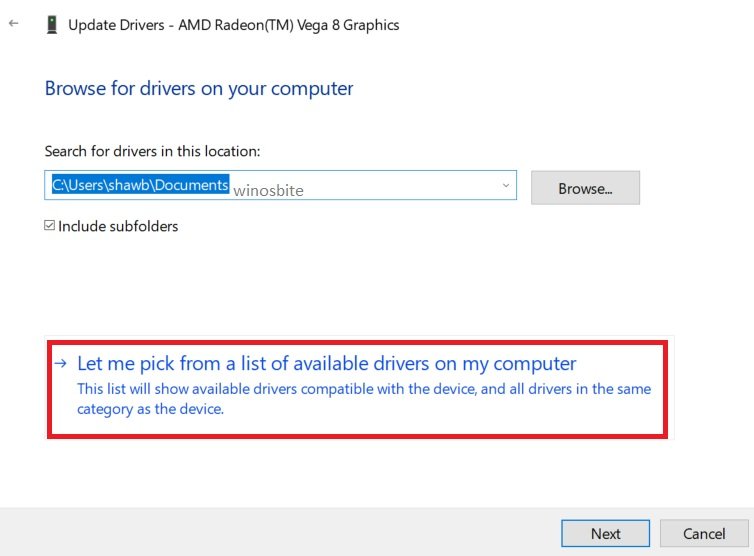
4. From the list of device drivers, choose Microsoft Basic Display Adapter

5. Click Next and install the driver; Your problem should be resolved now.
Bonus Tips: The majority of the laptop comes with a brightness keyboard shortcut. For example, if the screen brightness not changing for Lenovo laptop, then you can press the Fn+F5 button to decrease the brightness. Similarly press the Fn_F6 button to increase the screen brightness. Every laptop brands come with their own shortcuts, make sure to try those functions.
Conclusion
If you had to use the last method, your graphics card is malfunctioning and you should get your PC repaired. You can also try reinstalling Windows freshly. I hope this article was informative. We would love to hear your suggestions and queries, so please feel free to contact us or leave us a comment.
Other similar issues that have been fixed:

