
0x80240031 is an error code that is encountered by some users while trying to update their Windows 10 operating system to a newer build. This error code is seen in the Windows update application. Windows update is responsible for the delivery of software updates to your system to ensure its proper functioning. These software updates bring you the latest features, bug fixes, and security patches which play a crucial role in running your operating system without any hiccups.

Here, we will look at some reasons and effects of the error 0x80240031 in Windows update and try to fix it using numerous methods.
Quick Overivew
Reasons for the error 0x80240031 in Windows update
0x80240031 is a hexadecimal error code encountered in Windows update with the following message-
“There were problems installing some updates, but we will try again later. If you keep seeing this and want to search the web and contact support for information, this may help:
Windows 10 (build or version number) – Error 0x80240031″
The most common reasons for this error are-
- Corrupted update or system files
- Conflicting hardware drivers
- Startup services interfering with Windows update
How 0x80240031 affects your system
0x80240031 can be an annoying error as it won’t let you download and install the latest Windows update. Windows update is a crucial component of Microsoft Windows because-
- It provides you with the latest features and improvements of the new software
- Ensures that your PC is safe by updating the virus definitions using security patches
- Fixes minor bugs and issues in your current build of Windows
Not being able to download a new update means you are missing out on this extensive list of things offered by Microsoft.
You should not ignore this issue and apply the following methods to fix this problem.
Methods to fix the error 0x80240031 in Windows
I have arranged this list of methods from the priority of recommendation, so make sure to follow the list from top to bottom. I am sure that one of the methods will be able to fix the 0x80240031 error on your system.
1) Windows Update Troubleshooter
It is a good practice to run the Windows troubleshooter first in case of any system-related error as it can identify and fix the problems automatically.
1) Press Windows + I to open settings
2) Click on Update and Security option

3) From the side panel, click on Troubleshoot
4) In the main panel of the Troubleshoot option, click on Windows update (If you can’t find it, click on the small blue option ‘Additional Troubleshooters’ and you will see a list of troubleshooter which include Windows Update)

5) Let the Windows Update Troubleshooter identify and solve the issues automatically.
2) Safe mode with networking
Using this method, you will be able to boot up Windows with a minimal set of drivers and services. 0x80240031 error is mostly caused due to conflicting drivers and automatic startup type services.
1) In the start menu, open the Power option and while pressing and holding the SHIFT key, click on Restart

2) You will have boot options on your screen, click on Troubleshoot
3) Choose Advanced options
4) Select Startup Settings
5) Choose Restart and then from the list of options, select Enable Safe Mode with Networking (by pressing f5)

6) Once your Windows boot up, go to Windows Update and check if the problem is resolved.
3) Disabling delivery optimization and resetting Windows update
Disabling delivery optimization
1) Press Windows + I to go to the Settings application
2) Choose Update and Security
3) From the side panel, choose Delivery Optimization
4) Turn off the Allow downloads from other PCs option

Resetting Windows Update components
1) Open the command prompt as admin (Or PowerShell as admin)
2) Copy and paste the following commands one by one and press ENTER after each of them
- net stop bits
- net stop wuauserv
- net stop appidsvc
- net stop cryptsvc
3) Go to the directory C:\Windows\SoftwareDistribution and delete all the contents of the folder (This is a cache folder so deleting it won’t affect your PC in any way)

4) Copy and paste the following commands one by one and press ENTER after each of them
- net start bits
- net start wuauserv
- net start appidsvc
- net start cryptsvc
5) Restart your PC and check if the problem is resolved or not.
4) Manually update your PC with Windows Update Assistant (Formerly Windows Update Tool)
You should use this method to download the update if it was a Windows 10 version update with which you were having trouble downloading. In the case of security or .NET updates, this method won’t work.
1) Go to this link for the official Microsoft Windows 10: https://www.microsoft.com/en-in/software-download/windows10
2) Click on the Update Now button

3) An application will be downloaded, open the application, and follow the instructions on it to successfully update your Windows 10 to a newer version.
5) Delete INetCache folder
This is a cache folder that contains temporary internet files. Many users on Microsoft Windows forums have reported that deleting the INetCache folder on their computer has fixed the 0x80240031 error on their PC.
1) Go to the following directory
- C:\Users\<User Name>\AppData\Local\Microsoft\Windows
2) Look for the folder called INetCache and press SHIFT + DELETE to permanently delete the folder
3) Check if the problem is resolved.
6) Scan and repair your system files using SFC (system file checker) and DISM
Sometimes running a full scan and repairing corrupted files may help to get rid of Windows update errors.
1) Run command prompt as admin by searching it from the start menu(Or you can also use PowerShell)

2) Type sfc/scannow and press ENTER
3) SFC will start analyzing and fixing the system files

4) After SFC scan has finished, ENTER DISM /Online /Cleanup-Image /RestoreHealth
5) Let DISM restore the health of your C: drive.
These are quick ways to repair system files. For a more elaborate method to repair (replace) system files, check the method below.
7) Install Windows freshly using ‘Reset this PC’ feature
Using this feature, you can reinstall Windows 10 on your system without losing your files and settings
1) Search for Reset this PC in the start menu and click on it
2) Click on Get Started under Reset this PC option

3) In the new application window, click on Keep my files option
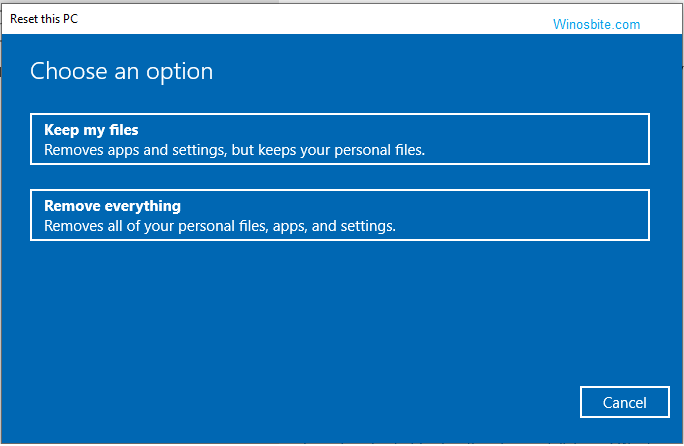
4) It may take a while for the process to be completed.
Conclusion
0x80240031 update error can be really annoying even though it doesn’t cause any immediate harm to your PC. I hope this article helped you fix this error. We would love to hear your suggestions and queries in the comments below or you may contact us.

