
The Backspace key plays an important role in the computer that moves the cursor backward. It is a very useful key for correcting typos. If the backspace key suddenly stops, then writing and working on the computer becomes difficult or impossible. So this backspace problem will have to be rectified right away. It is indeed frustrating but the problem can be fixed if you follow the below-given steps.

I have mention four solutions to fix the backspace problem, which are as follows:
Quick Overivew
Solution 1: Sticky Keys and the Filter Keys feature to be turned off
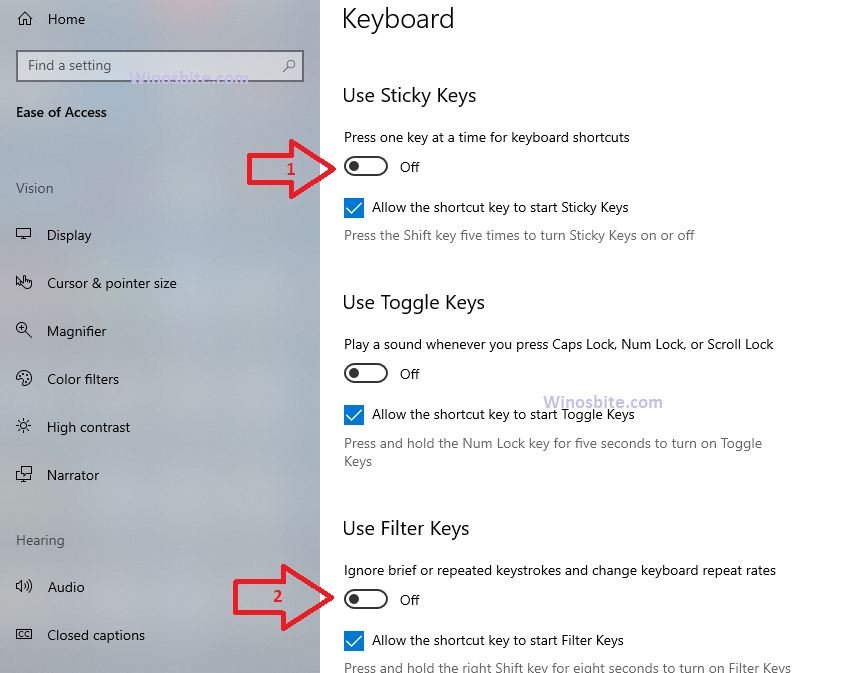
In Windows 10, the Sticky Keys and Filter keys serve two types of accessibility functions. With Sticky Keys, you can press one key at a time for keyboard shortcuts, whereas the Filter Keys is basically an accessibility function that informs the keyboard to ignore repeated keystrokes. When both the functions are enabled, then sometimes the backspace button may not work properly.
Follow the below steps to fix the Backspace problem:
1) Click on Start and type ease
2) Click on Ease of Access keyboard settings

3) Make sure to set OFF these 2 options Sticky Keys and Filter Keys
4) Now restart the PC to take effect.
You will find your backspace key to be working again now. In case it is still not functioning, try the next solution.
Learn how to disable F1 key on your keyboard.
Solution 2: Keyboard needs to be reinstalled
Another reason why the Backspace is not working because the connection between the keyboard and Windows operating system may have become altered or damaged. In this case, it is recommended to reinstall the keyboard driver to fix this problem. Follow the below steps to perform it:
1) Press the Windows and R key at the same time. This will activate the Run box.
2) Type devmgmt.msc and press Enter.

3) Click on Keyboard icon and it will list the drivers
4) Now, right-click over the keyboard driver and click on Uninstall Device

5) Reboot your computer.
Now, Windows will be reinstalling your keyboard automatically. Now check to see if your backspace key works.
Solution 3: Keyboard driver should be updated
There is still another solution, in case the above two solutions do not help.
You need to update your keyboard driver.
This might happen if the keyboard driver damaged or corrupt which could also stop the backspace to work properly.
For this, follow the 2nd method which is mentioned above. And instead of “Uninstall device”, choose Update driver and follow the steps. First Windows 10 will try to connect to the internet and download the latest driver. If the latest driver is not available online, then it will automatically install the driver.
Now, Restart your system and check if the backspace key works.
Solution 4: Check your Keyboard on another computer
Many times the keyboard doesn’t work properly on a particular PC. If you have tried all the above methods and backspace is still not working, then you may try this method to fix it.
Plug-out your keyboard and connect to another desktop PC or Laptop. And test whether the backspace key is working. If it is working, then it means that there is something wrong with the old PC. Whereas, if the backspace keyboard is still not working then it’s time to buy a new keyboard.
Bonus Tips:
Sometime the keyboard backspace and delete button may not work properly in windows 10 due to temporary malfunction in RAM (Random Access Memory). In that case, just save your work and restart the PC. This will automatically fix the problem.
Hence, if your Backspace key stops working, there is no need to panic. You can use any of the above easy solutions, and your problem will be solved.

