
It is a very common issue and is faced by many users using Windows 10. This Java Error Code 1618 message appears when you try to install a program while another one is already being installed or being processed by the MSI (Microsoft Installer). Note that the Microsoft Installer can only run one process at a time. So, running two instances simultaneously can create conflict and can cause some service errors.

Users get this error message when they try to install Java on their system. Also, it’s important to note that it doesn’t necessarily mean that there must be another instance of Java running in the background. It could be any one of the thousands of software that use Microsoft Installation.
Quick Overivew
What are the Java Error Code 1618 and their causes?
The error message looks like this:
“Java update did not complete: Please refer to the Java Help Center for troubleshooting information or contact your system administrator.”
There can also be many several causes other than the one mentioned above that can cause this error to occur. Some of these are listed below-
- There could be an error in the Microsoft Installer Service: The service might have been stopped or having some error state which can cause hinder the installation.
- Antivirus programs (mostly third-party ones) can be over-protective sometimes causing the Java installation to stop every time it starts
- The existing Java installation might be corrupted
- Windows Update can break the installer sometimes
Follow the methods below to fix the java error code 1618.
Methods to fix Java error 1618
Method 1: Wait till the existing installation is complete
Wait till your existing installation is complete as it is already mentioned above that the Microsoft Installer can run only one process at a time. Thus, it will show an error if another instance of the Microsoft Installer is already in use.
You can check if there is an instance that is already running by using the Task Manager.
- Press Ctrl+Shift+Esc together to launch the Task Manager
- Check if there is a process related to Windows Installer running or not; If there is a process running, then just allow it to finish.
Method 2: Restart the Microsoft Installer Service (msiexec.exe)
There are two ways for restarting the Microsoft Installer Service.
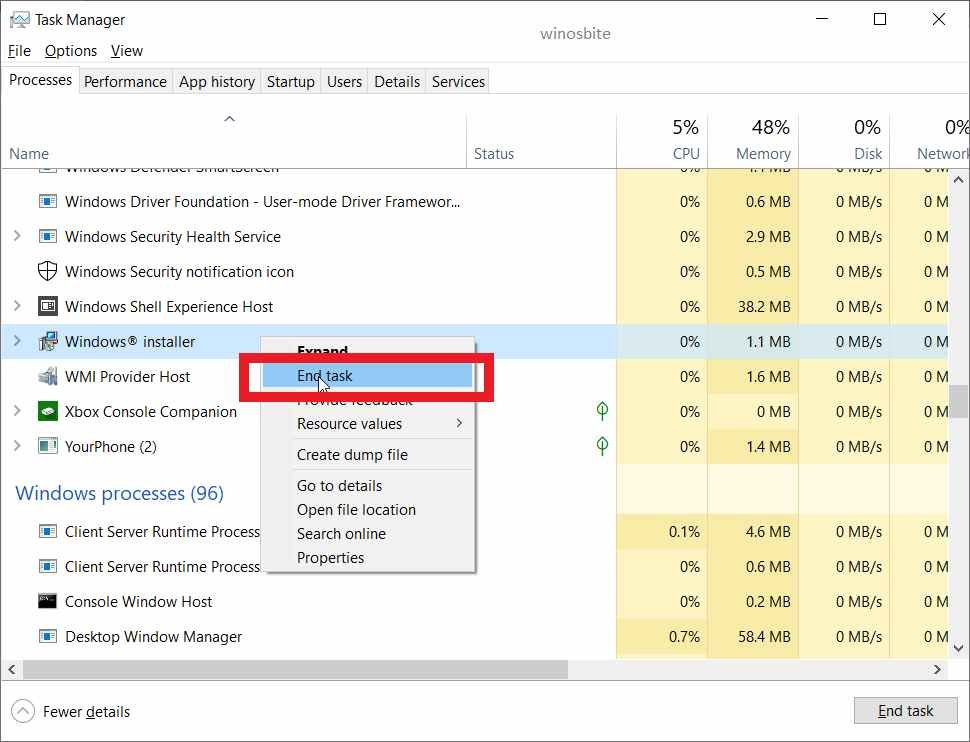
From the task manager-
1. Open the Task Manager by pressing Ctrl+Shift+Esc buttons
2. Make sure that you are under the Processes tab
3. Search for the Windows Installer Service process
4. Right-click on the process and click on the End task button
If you are unable to do the steps mention above then follow the next steps.
From services application-
1. Press Ctrl+R simultaneously to open the Run application
2. Type services.msc to open Services application

3. Locate the Windows Installer service
4. Right-click on it and then click on the Start option
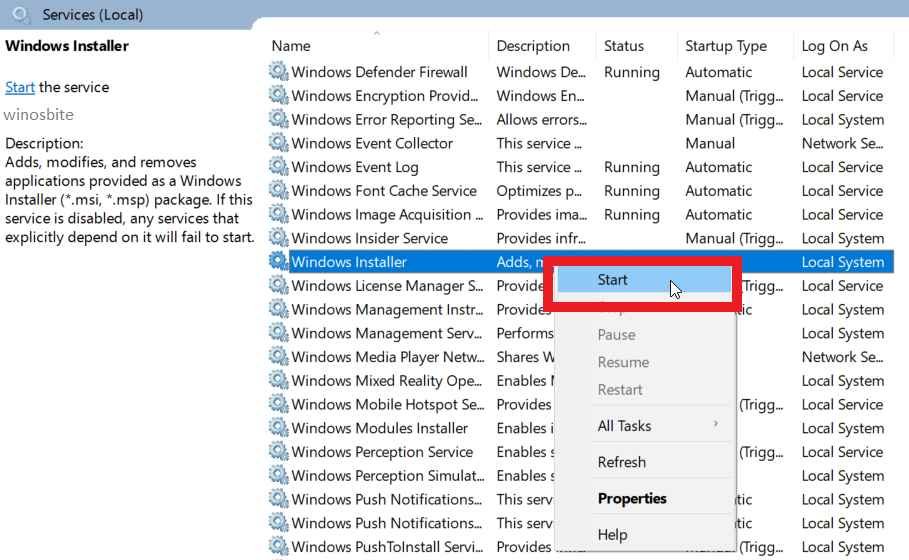
You can also restart the service if it is already running. Simply just click on Restart.
Method 3: Re-install Java
Uninstall the previous version of Java that is already installed. This can be done in two ways-
Using programs and features-
1. Press Ctrl+R to open the Run application
2. Type appwiz.cpl to open the programs and features Window

3. In the list of applications, locate and Right-click on Java, then click Uninstall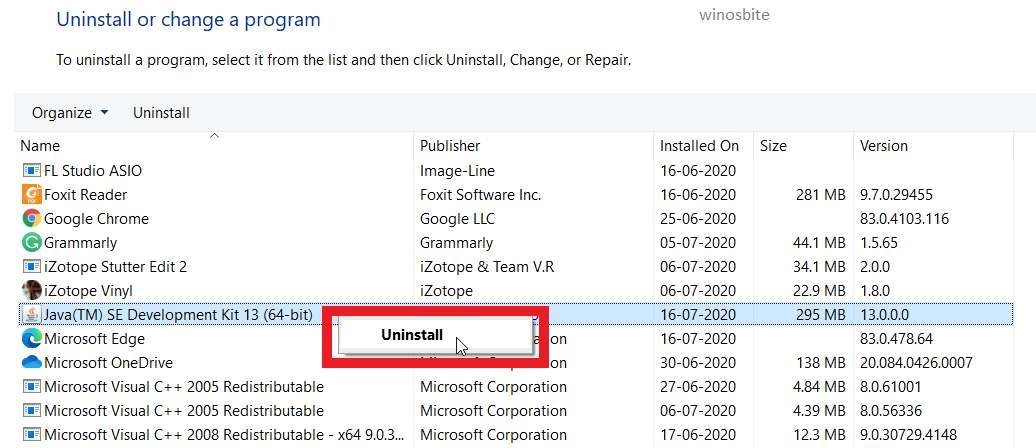
Using the Java uninstall tool-
From Java 8 Update 20, a Java Uninstall Tool is provided. It removes all the previous versions of Java automatically.
Now to install java again:
Download the latest version of Java from the official website and install it.
Use this link: https://www.java.com/ES/download/
Method 3: Install JAVA using the offline installer
Sometimes, the Online Installer does not work properly and the Microsoft Installer fails to download files for installation. Thus, it can result in an error. So, just download the offline installer which comes with all the necessary files required for installation and doesn’t need to download any file during the installation.
Uninstall the previous version of Java that is already installed (As we did in the above method)
Download the latest version of the offline installer from the official website of Java and run the installer.
Use the manual link.
If you don’t know which version to download (32-bit or 64-bit), use the following method to check your system type:
1. Press Windows + I to go to Windows Settings
2. Click on System

3. In the left panel, go to the About section and check your system type

Method 5: Update Windows on your PC
Windows updates remove bugs and errors. So, if there is an error with the Windows Installer then updating the Windows might fix it.
1. Press Win+I to open Windows Settings
2. Go to the Update & Security option

3. In Windows Update, click on Check for updates
4. Install the latest version if available by clicking on the Install button
Method 6: Disable your antivirus
Antivirus programs can cause issues while installation. So, disabling your antivirus before installing Java can help us avoid the problem. If you don’t have third-party antivirus software, follow the methods below to disable Windows defender temporarily-
1. Go to Windows Security by searching for it the start menu

2. Click on ‘Virus & Threat protection’
3. Now click on ‘Manage settings‘

4. Turn off the radio button for Real-Time protection
Method 7: Perform a clean boot and then install Java
Performing a clean boot will disable all the 3rd Party services that are running on your system. So, if all the above-mentioned methods fail then there is a possibility that a third-party application is conflicting with the installation. So, performing a clean boot can fix this. To perform a clean boot, follow the methods as mentioned:
1. Press Ctrl+R
2. Type msconfig and hit ENTER button

3. Under the Selective startup option, uncheck the box that says ‘Load Startup Items’ then proceed to the Services tab

4. Under the Services tab, check the ‘Hide all Microsoft Services‘ that is located on the bottom left corner then click on Disable All

5. In the Startup tab, open the Task manager
6. Go to the Startup tab in Task Manager and disable all of the startup items

Now, restart and try installing Java.
After installation is successfully complete, revert the changes we made in system configuration and task manager-
- Enable all startup items
- Use normal startup instead of the selective startup (refer step 3)
- Enable all services disabled in step 4.
Conclusion
I hope above mentioned methods help you to fix the Java code 1618. Kindly contact us or leave a comment below to give us your queries and suggestions.

