
Error 0xc8000222 is a windows installer error. It occurs when you try to do the Dot Net Framework setup on your system and the installation does not succeed. This may also not allow to update the Window. The error window prompts the user to:
- Windows could not search for new updates
- Go for Windows Update
- Send a problem report to Windows using its error reporting service
The HRESULT 0xc8000222 error occurs when the system files are broken or corrupt. Thus the information needed for the proper functioning of files, applications, and programs is unavailable.
There are a few reasons why 0xc8000222 Error may occur:
- The system was not shut down properly
- Corrupted shared libraries
- The system was recovering from a spyware/ adware or malware threat
- Incomplete or corrupt Downloaded files Cache or Windows Update Configuration
- Hardware malfunction
- Incomplete installation or uninstallation of any program/ application
- Corruption or deletion of file registry entries
When you try to update the Windows 10 but are unable to update then you may receive error code 0xc8000222. There might be several reasons behind this issue like corrupt Windows Update file, cache memory, etc.
Quick Overivew
Fix Windows Update Error 0xc8000222
The good news is that there are few ways to fix this error code 0xc8000222. Let us look at some of them:
Run System File Checker (SFC) Scan
1) Press the Windows button, type Command
2) Right-click over it and choose Run as Administrator
3) Type sfc/scannow and press Enter button

4) Scanning and fixing of the system will automatically begin and take about an hour or less. If any error is found, it will be automatically repaired.
If the above method not works, then you can try below one:
Delete Windows Update Configuration and its Cache Memory
1) Click on Windows button, type Command Prompt
2) Right-click over it and choose Run as Administrator

3) Type net stop WuAuServin the prompt window. Press Enter.

This will disable the Windows Update Service successfully.
4. Now, press the Windows + R button together open the Run toolbox.
5. Type %windir% in the box and press OK. This will open the Microsoft Windows system folder in C

6. Go to C drive and search for a folder named “Software Distribution. Rename it ” SDold “.

7) Open Command prompt window again and type net start WuAuServ. Wait until the message “The Windows Update service was started successfully” This will enable Windows Update Service previously disabled.

8. Now, restart your PC and check whether this step able to fix Windows Update Error 0xc8000222.
Please note that, this will not just fix 0xc8000222 but also solve the .Net Framework error.
METHOD III
System Restoration to an Earlier Time
1) Press the Windows + R button together
2) Type rstrui.exe in the box and click on OK

3) The “Restore system files and settings” window will now open. Click on Next

4) Select a Restore point from earlier time and date.

5) Select Finish on the Confirmation window

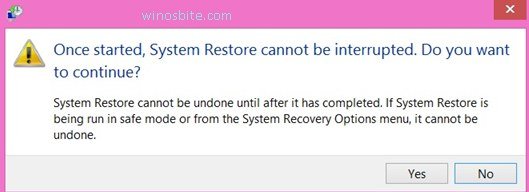
6. Select Yes in “Once started, System Restore cannot be interrupted. Do you want to continue ?” dialogue box,
7) Restart your system, this will fix the error code 0xc8000222.
Scan system with Malwarebytes or SuperAntiSpyware
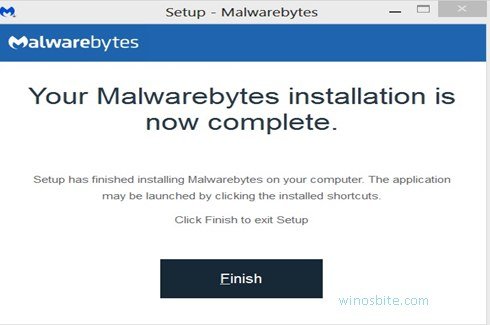
1) Go to URL https://www.malwarebytes.com/antimalware/, download and install the software.

2. Allow it to run as administrator and select preferred language

3. Click on Finish
4. Run a full scan in its scanner window.

Any threats detected can be quarantined. You can install and run SuperAntiSpyware similarly.
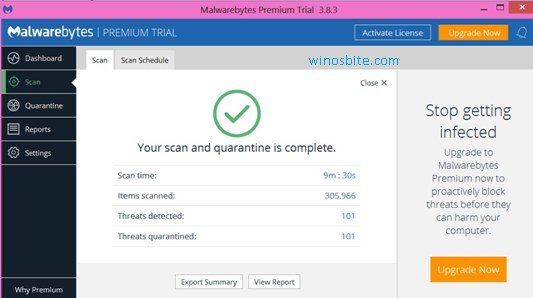
This method will remove any malware that is stopping windows to update from the server.
There is very similar error code 80070103 that stop Windows 10 user to download the update.
Disable All Except Microsoft Services
1) Press Windows + R to open Run toolbox
2) Type MSConfig and select OK.

3) Click on the Services tab. Check the “Hide all Microsoft services” box

4) Now, select Disable all and click on OK
5) The system will reboot.
This will help the Windows OS to download the update and solve the Error 0xc8000222.
There is a similar issue that Windows 10 user faces like Error code 0x80072efe in Windows 10.
Download Service Pack for Windows 7
A service pack (SP) is an amalgamation of all released updates up to present by Microsoft. Different service packs are available for different Windows OS. For Windows 7, do the following:
- Go to Microsoft Official website 2 to download Windows 7 Service Pack 1
- Click the Download button

3. Choose the download you want from the list given and click on Next

4. The download will now begin. Save in any drive. Make sure that C drive has more than 10 GB free space
5. Click Run and follow installation steps. The system will restart in the middle of the installation automatically.
Disable Antivirus and Firewall on a Temporary Basis
1) Move mouse over the Antivirus icon on the bottom right-hand side and click on Disable.
2) Now, we have to disable the Antivirus for a specific period of time, let’s choose 1 hour.

3) Now, open Control Panel, and click on System and Security

4) Click on Windows Defender Firewall

5) Click on Turn Windows Defender Firewall On or Off

6) Now, select a Disable option for both the radio button.

7) Now, run the Windows Update
This should allow the download latest update. If this works, then enable the Antivirus and Firewall once update complete.

