
This process CDPSvc stands for Connected Devices Platform Service and it was not present in the older version of Windows 10. Moreover, it was brought into the very recent versions of Windows 10. You must have seen CDPSvc running in your background and hence must be worried about it. So, here, I am going to clear the cloud and provide detailed information for the same.
Many users have mentioned that CDPSvc files found running in the system background and consuming high CPU. Well, there is nothing to worry about the cdpsvc.dll, this article will help you fathom the use of cdpsvc and how to disable it if you do not want it running in the background.
Quick Overivew
What is cdpsvc and is its usage?
Well since this is an absolute new service in Windows 10, there is no such detailed information on the CDPSvc, however, according to many trusted sources the CDPSvc is usually utilized for maintaining a hassle-free wireless connection with Smartphones, Scanners, Printers, and other such Bluetooth devices. Hence this is why the CDPSvc is often seen running in the background.
In short, cdpsvc offers services that help the system to connect different accessories like Scanner, Printer, Bluetooth etc.
File Size and Location
A genuine CDPSvc.dll file is located under the C:\Windows\System32\ folder. The average file size of cdpsvc is about 629 KB in Windows 10.
This is how an original files looks like in Windows 10:

Properties of CDPSvc
Some of the important file properties of CDPSvc are as follows.
| File description | Microsoft (R) CDP Service |
| Type | Application extension |
| File version | 10.0.18362.449 |
| Product name | Microsoft Windows Operating System |
| Product version | 10.0.18362.449 |
| Copyright | Microsoft Corporation. All rights reserve |
| Size | 629 KB |
| Date modified | 14-11-2019 22:49 |
| Language | English (United States) |
| Original filename | CDPSvc.dll |
Is cdpsvc safe or should it be disabled?
Well, as per the indicated usage of cdpsvc.dll it seems that disabling CDPSvc will not cause any observable problem in the Windows system. This is because the connection was still possible even when the CDPSvc was introduced in Windows 10.
Moreover, many windows users have experienced some issues after they have disabled the CDPSvc. Therefore I would not recommend disabling it, unless and until you experience high CPU usage by CDPSvc.
Methods to disable cdpsvc from Windows 10
I have mentioned some of the useful methods that will help you disable cdpsvc from your Windows.
Method 1: By Using Windows Service Manager
Well, you can easily disable the CDPSvc directly from the Windows Service Manager. Here is how you can do so.
1) Press Windows + R key.
2) Now in the Run search field type services.msc

3) Next press the Enter key.
Note: Now you will be seeing all the services active in your Windows 10 system.
4) Now just find Connected Devices Platform Service among all the services.
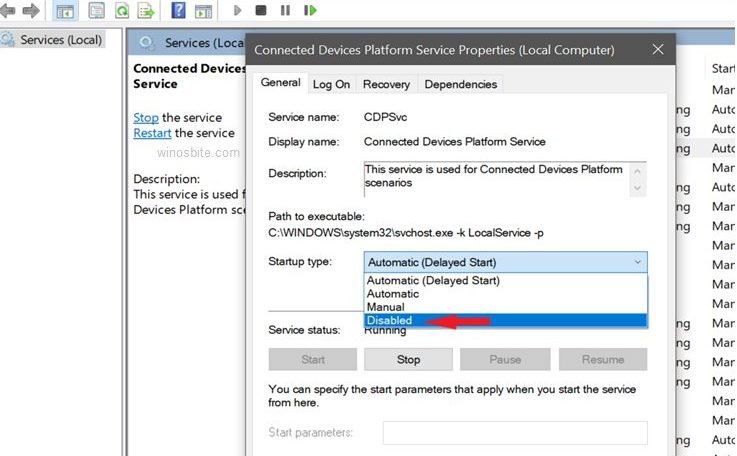
5), Now, here, right-click on Connected Devices Platform Service and select Properties
Next, just change the start-up type from Automatic (Delayed Start) to Disabled.
7. Now, click on the Apply button and then on Ok
That’s it this method will successfully disable the CDPSvc from your system. However, if you still see it running in the background, then you must follow the next method to disable it.
Method 2: By using the elevated Command Prompt
Here is how you successfully disable the CDPSvc using Command Prompt.
1) Type Command Prompt in the Windows search bar.
2) Now right click on the Command Prompt icon and select Run as Administrator.
3) Now, type the below command and press the Enter button
sc config CDP user SVC type=own
5) Now, close the command prompt and Restart your PC.
Hopefully, CDPSvc is disabled from your PC. In case it is still enabled, you must try to disable it using the Registry Editor.
Method 3: By using the Windows Registry Editor
Follow the steps to successfully disable CDPSvc
1) Press Windows + R button
2) Type regedit and click on the OK button

3) Next, navigate to the following location
Computer\HKEY_LOCAL_MACHINE\SYSTEM\CurrentControlSet\Services\CDPUserSvc
4) Now right-click on the Start key and select Modify.

5) Now change the value data from 2 to 4.

6) Click on the OK button.
7) Exit from the Registry Editor.
8) Restart your PC.
Well if you have followed and implemented the steps carefully, then hopefully CDPSvc is disabled from your system.
This was all the information about the CDPSvc. I hope you find the above information useful. Please write us a comment in case you have any suggestions or queries regarding CDPSvc.
Similar files:


