
This is a common Windows 10 update error code 0x80070490 that won’t allow you to install any latest updates. In plain language, 0x80070490 is an error code that signifies any issue with the Windows update operation. The issue occurs due to improper functioning of files related to the Component-Based Servicing and System Component Store.

Error 0x80070490 may occur on the following occasions:
- When Windows is updated
- When a Windows 7 or 8.1 operating system is upgraded to Windows 10.
- When a game or application is bought from Microsoft Store.
- When an application that was downloaded from Microsoft Store is updated.
Common Error
There are various error code messages for 0x80070490 that have been encountered by users. Some of them are given below:
- “Something went wrong. The error code is 0x80070490, in case you need it”
- “Something went wrong. We couldn’t find your settings. Error code 0x80070490”
- “Something happened and this app couldn’t be installed. Please try again. Error code: 0x80070490.”
- “Windows Store failed to sync machine license. Result code 0x80070490”
The reason behind error 0x80070490
There may be various reasons behind the occurrence of this error:
- Damaged or Corrupt Component-Based Service (CBS) files
- Corrupt file in System Component Store
- Windows Update service components are disabled manually
- Corrupt registry files
- Conflict with third-party Anti-virus software installed on the system.
How to fix error code 0x80070490 on Windows 10?
There are many ways to resolve the issues created by error 0x80070490. Let us look at some of these fixes for Windows 10:
Quick Overivew
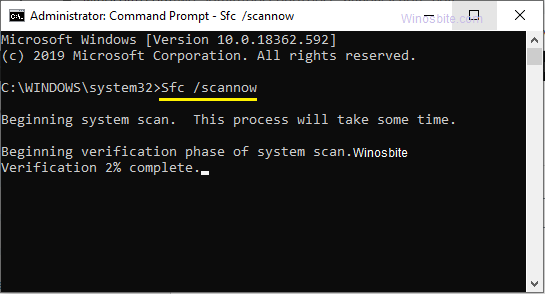
Using system file checker
This is a simple yet effective way to fix this error on Windows 10, here are the steps that you will have to follow:
- Click on the Start icon and type cmd
- Right-click on Command Prompt and select Run as administrator
- Select Yes when prompted by User Account Control
- In Command prompt, type sfc/scannow and hit Enter

- Wait for the process to finish and restart your system
In case, if the above method not help, then follow the below steps to fix 0x80070490 on your Windows system.
Using DISM (Deployment Image Servicing and Management)
This is another effective way to resolve 0x80070490 on your PC. DISM is basically a troubleshooting tool.
- Open Command Prompt and Run as administrator.
- Select Yes in the User Account Control dialogue box
- Type the command: DISM.exe /Online /Cleanup-Image /RestoreHealth
- Press the Enter key
- Restart your system.

Restarting Windows Update
Sometimes, the system won’t allow downloading updates on Windows 10 and shows error code 0x80070490. In that case, you will just have to restart the Windows update to get rid of this problem:
- Press Windows + R keys to open the RUN box
- Type services.msc and press Enter
- Search for Windows Update and double-click on it.
- Click on Stop under “Service status”
- Now, click on Start
- Click on Apply, and then on OK.


Using System Restore
This is one of the best methods to get rid of 0x80070490 on Windows 10 but should be used if the above methods not worked.
- Press Windows + R keys to open the RUN box
- Type rstrui.exe and press the Enter key
- Click on Next
- Select the Restore point from an earlier date and time you wish to go back to, and click on Next.
- Click on Finish
- Select Yes in the warning dialogue box.
- Reboot your computer.


Let the system to take some time to finish the process and once it’s done, then restart the PC.
Resetting Windows Update components
The error code 0x80070490 is directly impacting the Windows update, thus resetting it may help to start working fine. Here are the steps:
1) Open Command Prompt as an Administrator
2) Select Yes when prompted by User Account Control
3) Now, we have to stop Windows Update Service, Cryptographic, BITS and MSI Installer.
Type the following commands one by one and hit Enter after each:
- net stop wuauserv
- net stop cryptSvc
- net stop bits
- net stop msiserver
Now, we will have to rename the folders ‘SoftwareDistribution’ and ‘Catroot2’
Type the following commands and press Enter after each:
- ren C:\Windows\SoftwareDistribution SoftwareDistribution.old
- ren C:\Windows\System32\catroot2 Catroot2.old
Now, we will have to again restart Windows Update Service, Cryptographic, BITS and MSI Installer.
Now, type the following commands and press Enter after each:
- net start wuauserv
- net start cryptSvc
- net start bits
- net start msiserver
Now, finally, Restart your system
Troubleshoot Windows Update
Windows 10 comes with an inbuilt Troubleshoot feature that allows the system to fix the problem by itself. Here are the steps:
- Click on Start, type Settings and click on it
- Select Update & Security
- Click on Troubleshoot in the left panel
- Go to Windows Update and click on Run the troubleshooter
- Follow the instructions that appear henceforth.
- Once the issue is resolved, restart your system


Disable Antivirus/Firewall
It also might be possible that the installed antivirus or firewall not allowing your system to download the updates. In that case, you will have to temporarily disable the Antivirus and Firewall and then run the Windows update. If this work without showing any error message then that means the existing Antivirus/Firewall was blocking the system to download the updates.
Scanning your PC with Good Antivirus
Sometimes third-party software/apps infect your system and blocking the Windows PC to download the updates. In that case, it is recommended to run a complete scan on your system with a good Antivirus.
- Scan your system by running the anti-virus software installed.
- Delete any virus or malware, if found.
- Restart your computer.
You may also read and find out who is better antivirus between Kaspersky and Avast here.
Creating a new user account with administrative rights
This is the last yet effective way to resolve the error code 0x80070490 on Windows 10.
- Click on Start and go to Settings
- Go to Accounts and select Family & other users
- Under “Other users” click on Add someone else to this PC
- Select I don’t have this person’s sign-in information
- Click on Add a user without a Microsoft account
- Fill in the new credentials like user name, password and security questions
- Click on Next
- Now, click on the newly set user name under “Other users” and select Change account type
- Select Administrator as the account type and click on OK
- Now, login using this new account and then switch to your original (previous) account by navigating to Settings > Accounts
- Install the application or update, which prompted the error 0x80070490.
You may have to try few methods to fix error 0x80070490 in order to fix it and hope this guide help you to resolve the issue. If you still have any questions then let me know by leaving your comment below.

