I am using Windows 10 and receiving error code 8024402C, thus my system is not able to download the update. This error code 8024402C is irritating to thousands of users. Microsoft Windows Updates are very essential and must be done on a regular basis to keep the system up and running. It improves performance, updates security patches, fixes bugs, and installs new features and utilities.
But, some times you might face errors while updating your operating system. These errors can be a major issue as you wouldn’t get any updates, and eventually, leading your system to slow down and it can get vulnerable due to the lack of updated security patches.
One such error is the Update Error 8024402c. This error wouldn’t let you update your Windows 10 or 8 system. It is a very common error and is faced by many users.
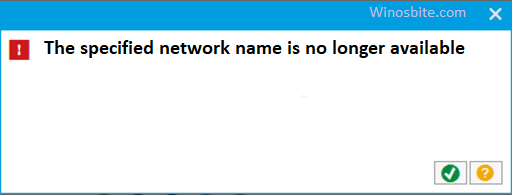
Your system will show you the following messages while trying to update your operating system:
“Windows could not search for new updates – Errors found 8024402C”
“An error occurred while checking for new updates for your computer.”
Quick Overivew
Factors causing this error can be as follows:
This error occurs when the Windows Update Services (SVCHOST) is unable to reach Microsoft’s Servers for some reasons such as –
- Programs such as Antivirus, Firewalls can block your Computer from reaching out the Microsoft’s Server.
- Your current DNS Address is incompatible with the Microsoft Servers.
- The Proxy Settings might have been incorrect.
- Your Internet Explorer is not configured properly.
- Issues regarding network connection like – slow internet, your Internet Service Provider (ISP) might have been blocking the Microsoft Servers, etc.
Steps to Fix Windows Update Error 8024402c
I will show you the methods by which you can fix error 8024402c issues and update your operating system. Follow the methods listed below, and don’t forget to switch to the next step if the current step fails.
Try the Windows Update Troubleshooter
Try troubleshooting your Windows Update using Windows Update Troubleshooter. If you are lucky enough, this will do the fix for you. Follow the mentioned steps to run the Troubleshooter.
1. Press WIN + I keys to open the Windows Settings.
2. Click on Update & Security. This will lead you to the Windows Update.

3. On the left pane, you will find the Troubleshoot Left-click on it to open the Troubleshooter.
4. Now, scroll down on the right pane and look for the Windows Update option, which will be listed under the Get up and running

5. Click on the Windows Update option and choose Run the troubleshooter.

6. The troubleshooter will now detect the problems, wait for it to complete the process, and then it will fix the problem for you.
Restart the system and try updating your operating system.
Update DNS Address
The Microsoft Servers can be incompatible with your current DNS (Domain Name Service) address. It that case, the Update would not be able to download files from the server and the system won’t update. Thus, it is advised to change the DNS Address.
1. Press WIN + R keys to open the RUN Command, then type ncpa.cpl, and hit the Enter key.

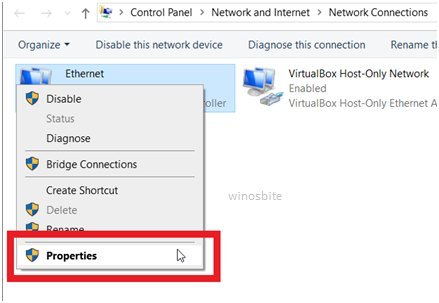
2. Choose the connection that you are using currently, right-click on it to open the drop-down menu, and choose the Properties

3. Double-click on the Internet Protocol Version 4(TCP/IPv4)
4. Now, under the second section choose to Use the following DNS server address.

5. Now, set the Preferred DNS server address to 8.8.8.8
6. Set the Alternate DNS Server address to 8.4.4.4
This is Google’s Public DNS Server address and is compatible with the Microsoft Servers.
- Click Now, try updating your windows again and see if it works.
NOTE:
If you are using Wi-Fi, then change the DNS Server Address from your Router Settings.
Learn how to disable router wifi here.
Disable the Windows Defender Firewall
The Windows Firewall is like a gate-keeper for your system. It controls the transmission of all the information that is going in and out through your system. So basically, it blocks all the potentially harmful programs/files that can enter your system.
Thus, it can also block your system update and can prevent you from retrieving the files needed for the update. To disable, follow these steps
1. Press WIN + R keys to open the RUN Command, then type ‘control’ and hit

2. This will open up the Control Panel. Now, click on System & Security.


3. Now, click on Windows Defender Firewall.


4. On the left pane, click on Turn Windows Defender Firewall on or off.


5. Now, select Turn off your Windows Defender Firewall from both Private & Public
(Look at the screenshot given below)


6. Click on Now, you have successfully turned off the Firewall, try installing the Update now.
NOTE:
If you are using any third-party firewall or similar kind of software, then make sure to disable it. You might need to go through the Software Manual for disabling it.
Warning:
Also, do not forget to turn on the Windows Firewall again as soon as you have completed the update because it can leave you vulnerable to attacks.
Disable the Windows Antivirus
Like, Windows Defender Firewall you might also need to disable your Windows Antivirus, as it may cause a similar kind of problem as that of the Firewall.
So, in order to disable your Windows Antivirus, you can follow the steps as mentioned below –
1. Click on the Windows Security icon from the Windows System Tray.


2. Then, click on Virus & threat protection.


3. Scroll down and click on Manage Settings.


4. Now, turn off the first two options named – ‘Real-time protection’ and ‘Cloud-delivered protection’ by clicking on the toggle switch.


You will be prompted by the UAC (User Account Control), choose YES to proceed.
A warning notification message will pop-up. Just ignore it.
NOTE:
If you are using any third-party antivirus or similar kinds of software like anti-malware, or root-kits, then make sure that you disable it. You might need to refer to the Software Manual for the disabling process.
Warning:
And also, do not forget to Enable the Windows Antivirus back again after the completion of the system update as it protects your computer against viruses and security threats.
Disable the UAC
The UAC (User Account Control) prevents potentially harmful programs form making changes to your computer. But, sometimes it can create a problem with your update due to a bug. Thus, you will have to disable for a while until your update completes.
1. Press WIN + R keys to open the RUN Command, then type ‘control’ and hit


2. This will open up the Control Panel. Now, click on System & Security.


3. Now, under the Security and Maintenance section, click on Change User Account Control settings.


4. Drag the slider down to the Never Notify option to disable it.


5. Click on OK, and choose YES when prompted. Try updating your operating system now.
Warning:
Do not forget to revert the UAC Settings back to default after the completion of the update.
Use DISM to Restore Disk Health
DISM stands for the Deployment Image Servicing and Management tool.
This tool helps us to Service Windows Image or to set up a Windows Preinstallation Media, through Command-Line.
1. Press the WIN key to open the Start Menu and type – ‘cmd’.
2. Then, right-click on the first option and select Run as administrator to launch the Command Prompt.


3. Now, type the following commands and hit Enter, one at a time.
Dism /Online /Cleanup-Image /CheckHealth
Dism /Online /Cleanup-Image /ScanHealth
Dism /Online /Cleanup-Image /RestoreHealth


4. Wait for the process to complete. Now, try updating your OS and it should work.
NOTE: Alternatively, you can Copy and Paste the above three lines of command in a notepad. Now, save the file and name it as – ‘dism.bat’. Now, just right click on the file and Run it as Administrator. This will do the job for you in one go.
Reset the Update Files
I have listed two ways by which you can reset your updated components. You might have to use the combination of both the methods to fix things.
Method 7(A):
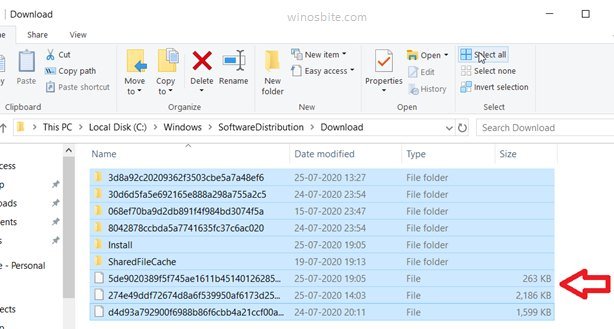
1. Go to the following location and delete all the contents of the folder.
C:\Windows\SoftwareDistribution\Download
2. Press Ctrl + A to select all the files in the directory and then press Shift + Del keys to delete everything.


3. Press the WIN key to open the Start Menu and type – ‘cmd’.
4. Then, right-click on the first option and select Run as administrator to launch the Command Prompt.
5. Now, type the following command and hit Enter.
wuauclt.exe /updatenow


Reset Winsock
1. Press the WIN key to open the Start Menu and type cmd.
2. Then, right-click on the first option and select Run as administrator to launch the Command Prompt.
3. Now, type one command and hit enter one after another
To Stop the services, use the following commands
net stop bits
net stop wuauserv
To reset the Winsock use the following command
netsh winsock reset
To reset the Proxy use the following command
netsh winhttp reset proxy
To Start the services use the following commands
net start bits
net start wuauserv


Now, check for updates and it should probably work.
Tweak the Internet Explorer Settings
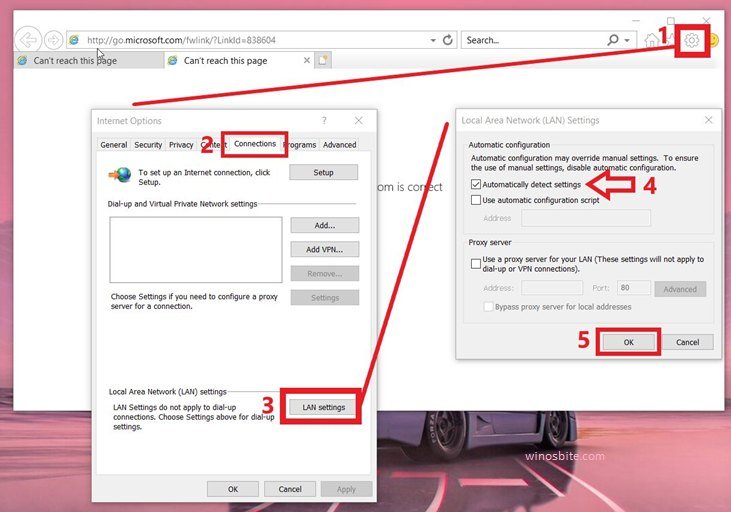
You might need to make some changes to the Internet Explorer Settings for it to automatically detect the LAN (Local Area Network) so that Windows can go online to get files for updates. Follow these steps, to make changes:
1. Open Internet Explorer.
2. Then, click on the Settings button, from the drop-down menu choose the Internet Options.
3. Now, go to the Connections tab and click on LAN Settings.
4. Under Automatic configuration, check the Automatically detect settings options, and then click OK.


Restart your system and try updating your operating system, this should fix the error.
Conclusion:
All the methods mentioned above should be enough to resolve this issue. Please, feel free to comment and share your thoughts regarding any Method or Step, and you also can ask us questions if you have any doubts and queries. Thank You!
Similar Update Issues:

